You are using an out of date browser. It may not display this or other websites correctly.
You should upgrade or use an alternative browser.
You should upgrade or use an alternative browser.
Optical drive activity light has got to go
- Thread starter delluel
- Start date
D
DelJo63
As amstech said, black marker or black touch up paint. I'd take everything apart and hit the LED with some sandpaper to make it easier for the marker or paint to grab onto it.
Unless you plan on opening it and desoldering the LED, a tape or black market should do it. I don't believe there is a "software" way of stopping it.

Invizibleyez
Posts: 73 +20
antiproduct
Posts: 308 +438
Put some Vantablack (https://en.wikipedia.org/wiki/Vantablack) on it
Trillionsin
Posts: 1,910 +488
Electrical tape or something removable if you change your mind. If you want to stay classy, get a HTPC case with a slim form factor style, no LED like a SilverStone SOD03 drive or something similar, otherwise tape will work just fine. Yes, you'll probably have to build a new PC since the parts won't fit. Use this as an excuse for the spouse if they are the one asking to dim it. lol *Any reason is a good reason to build a new PC.
Post pictures of your PC. I'd like to see it.
Post pictures of your PC. I'd like to see it.
Kibaruk
Posts: 3,836 +1,189
A bit of tape. I want to be cool like the other 4 guys who said tape already.
Edit: In the time it took me to write this, another cool guy made my 4 guys into 5.
Edit: In the time it took me to write this, another cool guy made my 4 guys into 5.
Trillionsin
Posts: 1,910 +488
A bit of tape. I want to be cool like the other 4 guys who said tape already.
Edit: In the time it took me to write this, another cool guy made my 4 guys into 5.
ETMR!
As everyone has said, tape. Heck, there is has been a market for this issue for quite some time. Just search for "light cover sticker" That is if you want to buy a product specifically meant for it.
Vrmithrax
Posts: 1,609 +679
I've dug into my drive and snipped one of the LED leads before... Not exactly elegant, but it's effective.
You could also try finding some tinted plastic / film, and cut a small piece to fit right over the light. I did that on a rectangular LED I had on an HTPC unit, where the LED was eyeball-melting bright when looking at it straight on. Snipped a little tinted film to match the size, a drop of clear superglue, and I have a very subdued LED indicator. Might be useful in the case of an optical drive, so you can tell if your drive is spinning up (troubleshooting bonus later).
You could also try finding some tinted plastic / film, and cut a small piece to fit right over the light. I did that on a rectangular LED I had on an HTPC unit, where the LED was eyeball-melting bright when looking at it straight on. Snipped a little tinted film to match the size, a drop of clear superglue, and I have a very subdued LED indicator. Might be useful in the case of an optical drive, so you can tell if your drive is spinning up (troubleshooting bonus later).
yRaz
Posts: 6,390 +9,428
Easy, open it up and cut the positive wire. Did the same thing to the trunk button on my key fob because the trunk would open whenever I put my keys in my pocket. Cut the trace wire and put a dab of hot glue over the connection
Last edited:
MannerMauler
Posts: 213 +56
Easy, open it up and cut the positive wire. Did the same thing to the trunk button on my key fob because the trunk would open whenever I put my keys in my pocket. Cut the trace wire and put a dab of hot glue over the connection
I've dug into my drive and snipped one of the LED leads before... Not exactly elegant, but it's effective.
You could also try finding some tinted plastic/film, and cut a small piece to fit right over the light. I did that on a rectangular LED I had on an HTPC unit, where the LED was eyeball-melting bright when looking at it straight on. Snipped a little tinted film to match the size, a drop of clear superglue, and I have a very subdued LED indicator. Might be useful in the case of an optical drive, so you can tell if your drive is spinning up (troubleshooting bonus later).
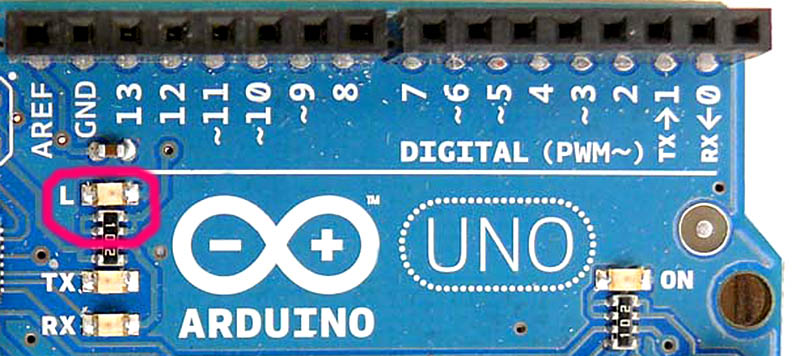
That wouldn't work if the LED is directly on the circuit board like on the Arduino Uno. You'd have to unsolder it like Puiu said.It'd be hard if you have little to no experience with soldering, let alone if you have a soldering iron. Soldering irons aren't a common household item.
Vrmithrax
Posts: 1,609 +679
That wouldn't work if the LED is directly on the circuit board like on the Arduino Uno. You'd have to unsolder it like Puiu said.It'd be hard if you have little to no experience with soldering, let alone if you have a soldering iron. Soldering irons aren't a common household item.
True, but we're talking an optical drive here... The LED is often remotely connected when compared to the driver board, in my experience (but it's not like I take DVD drives apart regularly, so that may vary depending on model, hardware generation, alignment of stars, etc.).
But, to be fair, the "open and snip" process in itself can be a bit daunting. You have to have the micro screwdrivers, steady hands, and usually try not to do anything in the disassembly process that might disturb the disc drive's physical mechanism - that's a genie that is hard to stuff back in the bottle, once it escapes.
yRaz
Posts: 6,390 +9,428
Just pull it off... There are also two sides to a circuit bored, you can cut the traces on the other side. It really doesn't matter if it's the positive or ground trace either, it's just good practice to go for the positive.That wouldn't work if the LED is directly on the circuit board like on the Arduino Uno. You'd have to unsolder it like Puiu said.It'd be hard if you have little to no experience with soldering, let alone if you have a soldering iron. Soldering irons aren't a common household item.
EDIT:
actually looking further at it you can see the traces, just cut one.
Last edited:
MannerMauler
Posts: 213 +56
That could cause damage to other parts of the board.Just pull it off...
True, but we're talking an optical drive here... The LED is often remotely connected when compared to the driver board, in my experience (but it's not like I take DVD drives apart regularly, so that may vary depending on model, hardware generation, alignment of stars, etc.).
But, to be fair, the "open and snip" process in itself can be a bit daunting. You have to have the micro screwdrivers, steady hands, and usually try not to do anything in the disassembly process that might disturb the disc drive's physical mechanism - that's a genie that is hard to stuff back in the bottle, once it escapes.
Plenty of good points. whether or not the LED is directly on the circuit board probably depends on the quality of the DVD/cd drive. Your average off the shelf media centers from Staples/Office Depot/etc probably are as you describe.
yRaz
Posts: 6,390 +9,428
That could cause damage to other parts of the board.
Well the traces are visable on the picture you showed. If you don't want to cause damage to the board you can cut the traces and twist the component off. While there is a CHANCE you could damage the board it's unlikely if you do it right. Like I said before I just cut the positive, dab it with hot glue and be done with it.
Similar threads
- Replies
- 6
- Views
- 554
- Replies
- 0
- Views
- 279
- Replies
- 5
- Views
- 13K
Latest posts
-
 DVD-like optical disc could store 1.6 petabits (or 200 terabytes) on 100 layers
- johnsonlam.hk replied
-
 AMD Radeon RX 8000 RDNA 4 GPUs rumored to use slower 18 Gbps GDDR6 memory
- GodisanAtheist replied
-
 Razer launches $160 Viper V3 Pro gaming mouse with 8,000 Hz polling rate
- user478318 replied
-
TechSpot is dedicated to computer enthusiasts and power users.
Ask a question and give support.
Join the community here, it only takes a minute.