Step 2: Create a New Partition on Windows XP
If you've read the previous section explaining how to create a new partition using Vista's built-in tools you will undoubtedly notice that the following additional steps are not required in that situation.
Here, the overall process is essentially the same, but we'll be using GParted instead of the Windows Disk Management utility. Windows XP users will ultimately have to rely on a third party tool like this.
Download the latest copy of GParted here, and then burn it to a disc just like you did with the Windows 7 ISO – GParted will fit on a CD.
After you've downloaded and burned your image of GParted, put it in your optical drive and reboot. Shortly after booting off the disc you'll have to choose your preferred language, keymap and screen resolution.
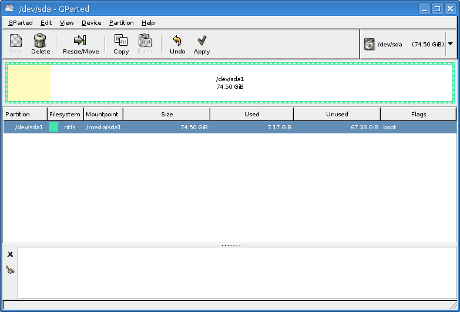
Once the partition software has loaded, right click the partition you're going to resize (you probably only have one and it's likely on "dev/hda1") and select "Resize/Move".

This should present you with drive capacity information and the option to enter a new size you'd like your partition to be. The recommended minimum partition size for Windows 7 is 16GB, so ensure that your new partition will meet that requirement.

You should now see unallocated space on your hard drive in the capacity you specified, situated just after your resized partition.
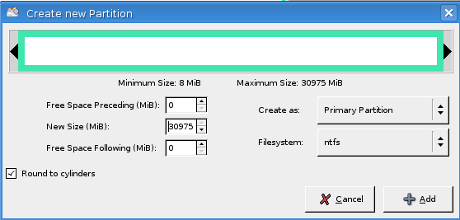
Right click the newly unallocated space and select "New". This ought to open a window requesting the amount of free space you'd like preceding and following the new partition as well as the new partition's size. Fill in 0 for both the free space preceding and following to occupy the entire unallocated space. Designate it a "Primary Partition" and format it using "NTFS".


You should now see a healthy primary partition with the capacity you defined replace the unallocated space. Click apply up top to initialize the operation. You can now move on to Step 3.