The release of Mozilla Firefox 2 further expands the capabilities and features of this highly regarded Internet browser, proving that just because you are popular doesn't mean you should slack off. Some of the new and updated features include: a visual refresh, integrated phishing protection, browser session resuming, live Titles and JavaScript 1.7 support (a more complete listing can be found in the release notes).
Regardless of how you feel about Mozilla Firefox, it's quite fair to say that much of the change and innovation in Internet browsers in recent years has happened because of it. This guide goes through numerous configuration tips and tweaks for Firefox 2, covering all aspects of the browser such as the options menu, preferences, CSS customization, interface, extensions and more.
Additionally, a TechSpot first - mini-videos are now sprinkled throughout the guide, better illustrating some of the content and options to be selected (all created using the excellent CamStudio).
Installation and Troubleshooting
The latest version of Firefox can be downloaded here for Windows and Mac OS X. Check mozilla.org for additional operating systems supported and languages. For known issues and troubleshooting information make sure you check the release notes. More detailed troubleshooting information can be found on the Mozilla Technical Support site should you require it as well.
Profiles
Before truly delving into tweaking Firefox, it is worth having an understanding of Profiles. Firefox assigns all personal and saved settings data to a profile folder. In this way it is possible to have more than one configuration of Firefox, or perform troubleshooting by creating a new standard profile. The default location of the profile folder varies depending on the OS used:
Windows XP/2000. C:\Documents and Settings\Username\Application Data\Mozilla\Firefox\Profiles\profilename\
Windows 95/98/Me. C:\Windows\Application Data\Mozilla\Firefox\Profiles\profilename\
Linux. ~/.mozilla/firefox/profilename/
Mac OS X. ~/Library/Application Support/Firefox/Profiles/profilename/
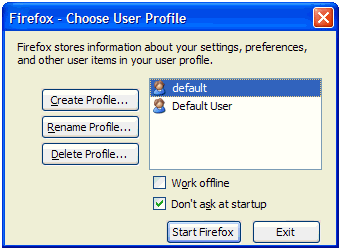
To backup a profile simply copy the relevant Profiles subfolder(s). By default only one profile is used. Using the Profile Manager you can manage multiple profile, which can be useful for a variety of reasons. Click Start, Run, type firefox -ProfileManager and click Ok.

Create Profile. Clicking this button launches the Create Profile Wizard which guides you through creating a new profile with default installation settings. This is useful for troubleshooting/testing purposes as you may be able to determine whether, for example, site compatibility issues or crashes you're experiencing are caused by the site itself or a Firefox option you changed.
Rename Profile. By clicking on a listed profile then clicking this button you may rename the profile. You can use this to distinguish easily between multiple profiles, should you choose to use them.
Delete Profile. By clicking on a listed profile then clicking this button you may delete profiles. Do not do this unless you are absolutely sure you have retrieved any needed data from the profile, e.g. bookmarks and that the profile was not located in an existing directory as all data will be deleted from the directory.
Moving/Restoring Profiles
In the event you need to move existing profiles or want to restore a backed up profile take the following steps;
1. Close all Firefox sessions.
2. Move the profile/backup profile subfolder(s) to the new location, e.g. C:\Documents and Settings\Username\Application Data\Mozilla\Firefox\Profiles\pirnplj3.Default\ to F:\pirnplj3.Default\.
3. Open the profiles.ini file with any text editor; this file is located in the directory before the Profiles folder, e.g. C:\Documents and Settings\Username\Application Data\Mozilla\Firefox\. It will appears similar to the beneath:
[General]
StartWithLastProfile=1
[Profile0]
Name=Default User
IsRelative=1
Path=Profiles/pirnplj3.Default
[Profile1]
Name=Default
IsRelative=1
Path=Profiles/v7km716m.Default
Default=1In the event you've multiple profiles (as in the above) determine which profile is affected. In this example it is the first profile listed (pirnplj3.Default). As the profile has been moved to a different drive, i.e. it's not located in the Profiles subfolder the IsRelative=1 entry needs to be changed to IsRelative=0 (in the event the profile is to be located in the existing Profiles directory leave this set to IsRelative=0). Now change the Path=Profiles/pirnplj3.Default entry to match the new folder, in this case F:\pirnplj3.Default. Save the changes and close the file.
4. Load Firefox, which will now use your new profile locations if configured correctly.
Now that you understand how to locate, backup and use profiles we can begin to configure Firefox itself.
This guide is probably one of the most comprehensive ones we have ever written, weighting in at a whooping 19 pages all packed with content. For that same reason we suggest you use the page navigation menu at the bottom of this page, so you can jump back and forward and check the areas you are most interested in.
