Monitor calibration is very important to a creative professional's workflow, but pretty much anyone can benefit from properly adjusting your monitor. Calibration will deliver color accuracy, it will correct most problems with how a monitor ships from the factory including white balance, gamma and oversaturation issues, and it can also help when trying to color match two different displays for a consistent experience.
This article will detail the method that we use for display calibration in our monitor reviews, albeit a bit simplified in some areas. We'll talk about the hardware you need, how to set up your monitor for calibration, and which settings are best to use within the software. We don't anticipate any of this will be too technical, provided you have the tools this is a relatively straightforward process.
Choosing the Hardware
So let's start by talking about the tools, because this is going to be a stumbling block for many people. It's not possible to calibrate a monitor by eye or without any external hardware, you'll need to purchase a color calibration tool to use during the process.
For those with budget monitors this may not make sense as the calibration hardware can be more expensive than the monitor itself, but if you have a high quality display or have multiple displays, a color calibration tool can be a good investment.

Calibration tools are generally split into two families: colorimeters, and spectrophotometers. Colorimeters are particularly good at handling a wide range of luminances, so they're great at low light readings and very well suited to contrast measurements. Spectrophotometers are more accurate at handling color readings and are more versatile, but are not as good for lower light measurements, generally speaking.
But for most consumer applications and casual users, the main difference between these devices will be the price. Like with any tool, you can get scientific-grade colorimeters and spectrophotometers with price tags in the thousands of dollars, but for entry-level devices, colorimeters are far cheaper. You can get a very capable colorimeter for around $100 to $200, while spectrophotometers tend to start at over $1,000, putting them out of reach of most non-professional calibrators.
In other words, if you're just starting out with calibration and want a basic yet capable tool for your monitors, the best option will be a colorimeter. Later, if you want the higher accuracy and greater capabilities of a spectrophotometer, they are a good upgrade path and it's what we use for our reviews, but we wouldn't recommend them for most people just starting out.
There are several different colorimeter options on the market, the two most popular are the X-Rite i1Display series and the Datacolor Spyder series. Either one will be fine, though if we were to recommend a specific model, we'd choose the X-Rite i1Display Pro. It's accurate, fast, works across a range of display types. For just over $200, we think it delivers great value given the specifications. The Spyder series tend to be a bit cheaper though, so it might depend on your budget.
For this guide we'll be using the i1Display Pro, but the principles should apply to other colorimeter models on the market. Using a spectrophotometer is a tad different though, so if you've splurged on a higher end device, this guide won't be for you.
Setting up the Display
We have our calibration hardware, now let's set up the display so it's ready for calibration. During the calibration process, we'll be generating an ICC profile, which is essentially a software table that tells your operating system and applications how to translate colors so they appear accurately on your display. But software profiles are a little finicky, they don't work in all applications and this translation process can't necessarily fix all the accuracy problems with your monitor.
For this reason, it's super important that we do as much of the calibration process as possible in the actual hardware of the display. The less the ICC profile needs to do, the better results we'll get. On most consumer or gaming displays, there's not a whole lot we can do to calibrate them by changing settings in the on screen display. Typically you'll need a professional grade display to gain access to more hardware calibration features, but we're not covering that in this guide. Still, it's important to go through and assess what changes we can make.

The best starting point with most monitors is simply to reset the settings to their factory default. With most modern displays, this will put us in a nice default position we can work with. Contrast is one example of a setting that generally comes optimized from the factory, whatever setting is the default tends to be as high as you can push contrast without distorting or clipping the image. Similar with settings like sharpness, gamma and saturation: these tend to come optimized by default, and changing them will negatively affect the image.

With more advanced calibration software like Portrait Display's CALMAN we can go further into calibration and analyze then optimize settings like gamma, contrast and saturation with advanced, professional grade software tools. But CALMAN is expensive professional software, and for the purpose of this guide, we're using a free tool that's more suited to entry-level calibrators. This is why in this guide we'd recommend leaving some color settings at their defaults.
There are a range of settings that should be disabled before we calibrate the display. Most of these settings hurt accuracy and should be disabled anyway if you want the best color experience, but on occasion they can be useful in some conditions.
Low blue light filters should be disabled, as should shadow boosting modes for game cheating. We'd also recommend disabling any dynamic contrast features, image "enhancement" modes, backlight strobing modes or really anything that post processes the image in the display. On some monitor brands like LG for example, we'd also recommend disabling the eco or power saving modes as they can affect accuracy through luminance compensation.

For wide gamut displays that have an sRGB gamut clamp or gamut toggle in the settings, generally we'd recommend calibrating with the toggle disabled, giving the calibration software access to the full gamut of the display. However in some circumstances you may want to calibrate with the sRGB gamut clamp enabled, such as if you always want an sRGB gamut, even in apps that don't support the ICC profile.
If you use software like f.lux or any other tool that changes white balance depending on the time of day, I'd also uninstall this software if you're interested in calibration. You simply won't ever get an accurate image when using a tool like that. Some monitors have this functionality built in so naturally we'd disable that, too.

From here, the next most important thing is to choose a brightness level you want to use the monitor at. Changing the brightness of the monitor after calibration can affect accuracy and the results - typically not by much, but it's still an important consideration. You should settle on a brightness level first that you want to maintain throughout the calibration process.

Another important factor is to make sure the surface of the display is clean. The colorimeter we're using needs to be placed directly on the display and any grime, fingerprint, dust, etc. will impact the result. We'd also recommend calibrating in a dark room with no ambient lighting. This will minimize the chance of reflections impacting results.

Also, ensure your monitor has been operating for at least 30 minutes, allowing it to warm up, before calibration. Color performance can change slightly with temperature, so it's really important that you're sitting in a steady warm state, not a fresh cold state, before proceeding.
Software Calibration Process
For calibration, we'll be using DisplayCAL, which is an excellent free tool that covers all the basics and even some advanced functionality for display calibration. Given the complexities involved with color science it's amazing this tool is available for free, though you can always support them with a donation.

Install DisplayCAL and when presented the option, you should let the software handle calibration profile loading. The DisplayCAL Profile Loader is far better than the color management system included with Windows. You should, of course, also install the driver package for the colorimeter you'll be using throughout this process and plug it in.

Upon opening DisplayCAL for the first time you'll be prompted to perform some additional setup, like installing the color engine for the software. In the main window of DisplayCAL, you'll want to check and make sure your colorimeter is appearing correctly.
It should appear under the Instrument header, if not, click on the Tools menu and select "detect display devices and instruments". Failing that, some devices need additional drivers to work with DisplayCAL. Head to the tools menu again, go to Instrument then click "Install ArgyllCMS instrument drivers".


At this point your instrument should be appearing. The mode should also be set to LCD by default, if you are calibrating a CRT or Plasma display you'll want to change that to refresh mode, but for most users, keep it on LCD. You should also see under "Display" the exact monitor you want to calibrate, if you have multiple monitors, this is the place to select the display for calibration. All other checkboxes should be left unchecked, unless you are calibrating an OLED, in which case you should enable white level drift compensation.

The single most important setting to modify here is the correction. Colorimeters require a correction profile to more accurately analyze and calibrate displays, because unlike a more expensive spectrophotometer, they are unable to spectrally profile a display from scratch in their hardware. So depending on the type of display you are calibrating, you need to select a correction that matches the technology being used.
Without guidance, this is a tricky proposition, because it requires knowing what sort of technology your monitor is using. So we'll provide our thoughts, based on the corrections available for the i1Display Pro. As you can see there are lots of options.

For most standard monitors that only have an sRGB gamut, you want to use the LCD White LED family correction. This is the most common profile to use and it should be selected by default. Most monitors released in the last decade that are sRGB-only, so no wide gamut or DCI-P3 support, will be compatible with this correction.

With wide gamut monitors, it's more tricky. For most wide gamut displays, I'd recommend using the LCD PFS Phosphor WLED family correction. As of the current version of DisplayCAL there are three other PFS Phosphor corrections available, but unless you are calibrating the specific models listed there (or similar types), we'd recommend using the "PFS Phosphor WLED family" correction. If you are completely unsure about which wide gamut technology you have, we'd also just recommend sticking to PFS Phosphor WLED family.
If you have an old wide gamut monitor, you might get better results using one of the LCD GB-r-LED profiles. However the PFS Phosphor profile is better suited to modern displays. If you have a Samsung monitor or display that uses their Quantum Dot technology, use the Quantum Dot LED profile. The other LCD corrections are generally more niche and unless you specifically know it's the right profile to use, stick to the ones we've mentioned.
If you are calibrating a display that doesn't use LCD technology, you'll also see several other correction profiles for CRT, Plasma, Projector and OLED displays. We recommend using the RGB OLED family profile for most OLED displays, unless you are calibrating a TV that uses an LG OLED panel. In that situation you should use the WOLED profile, and we should note that most OLED TVs use LG panels, so it's the most appropriate to use for OLED TVs.
Alright, at this point you should have selected the appropriate correction for the display you are calibrating. Now we need to choose the right calibration settings.
For most people, we'd simply recommend using the drop down at the top of DisplayCAL and choosing the sRGB settings profile. If you know what you're doing, you could mess around further with the settings under the "Calibration" tab if you specifically wanted to use different gamma or white points, but the default sRGB profile is best for most monitor calibration.
We should also note here that even if you have a wide gamut monitor, say 95% P3 support, you should still use the sRGB settings profile for calibration. These settings merely outline the correct gamma and whitepoint to calibrate to, it doesn't force the display into a specific color gamut. Assuming you didn't clamp the gamut using your monitor's OSD, the ICC profile you end up with will always support the full gamut of the display. Whether an application chooses to utilize the entire gamut or just the sRGB portion is up to the application and the content it's displaying. This ensures accuracy for all types of content.
You can think of the ICC profile as being a translator between the content and display. Without the ICC profile, the content (or application showing the content) has no idea what the display is capable of, and might assume a wide gamut panel is just a mere sRGB panel. The color content then gets lost in translation, expanded up to wide gamut, and it ends up looking oversaturated. The ICC profile tells the content: "hey, if you want to show an sRGB image on this 95% P3 display, this is how to do it" and we get a nice translation of colors and an accurate image.
With our settings dialed in, our display is selected, and our calibration tool has the appropriate correction applied. Now it's time to calibrate and profile the display.

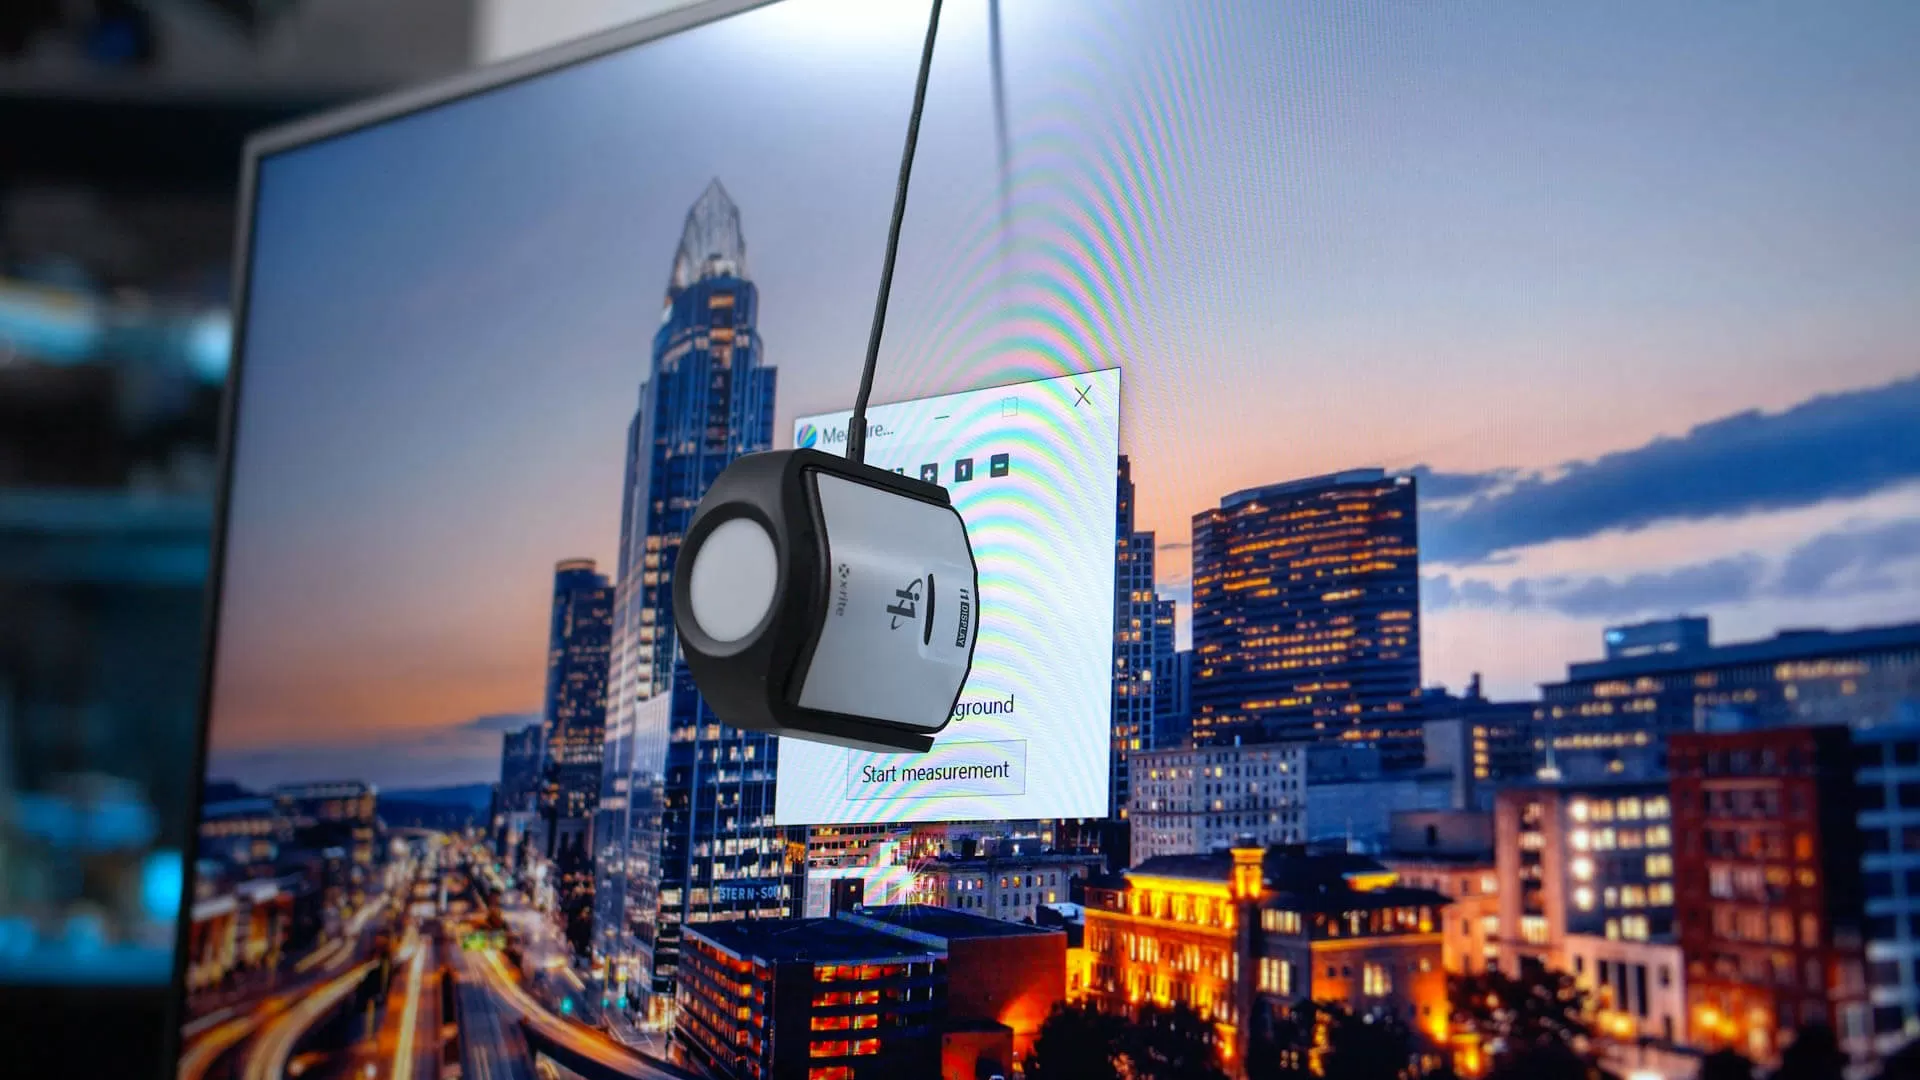
A new window should have appeared on the display you want to calibrate. It's now time to place the colorimeter on the display. With this sort of colorimeter you first want to remove the ambient light diffuser by swivelling it around to reveal the lens. Then hang the cable over the top of the monitor, with the counterweight positioned on the back of the display, keeping the colorimeter in place. Finally, align the lens with the crosshair in the DisplayCAL window.

The colorimeter should sit flush with the screen, any gaps will break the seal and potentially introduce ambient light, affecting the results. The colorimeter should also be in the center of the display. Generally you should always calibrate a monitor in the center because that's where you'll be looking most often. If you accidentally move the DisplayCAL window off-center, you can get it back to the middle by pressing maximize, then the 1 button (normal size).

With the colorimeter now in position, let's hit start measurement.
DisplayCAL will set up the instrument, then eventually the buttons will no longer be greyed out. From here we want to hit start measurement again. This will give us some basic RGB color information as well as a luminance level for the display. Here is where we'll perform the final bit of hardware calibration before proceeding.

The goal is getting the three RGB gain bars at the same height, while maintaining the luminance or brightness level we initially chose. To do this, we want to find the white balance or color controls in the monitor's on screen display, and set the white balance to user mode. This will usually bring up three controls for the red, green and blue channels. Then, with DisplayCAL running, we want to adjust each of these settings until the bars are the same height and DisplayCAL gives us the green text tick of approval. If while changing the white balance, the luminance also changes, now is a good time to re-adjust the brightness of your monitor to bring it back up to where it started.

This can be a fiddly process that takes a bit of time to nail down, sometimes you won't be able to get all the bars at the same height, so just settle on the best results you can get. After that's done, it's finally time to hit stop measurement, and hit the calibrate button.

Now you can sit back and relax, the process will take a bit of time to work through profiling and calibrating the display automatically, and during this time it's best not to use the display being calibrated. At the end, DisplayCAL will give you a report, and you can click on "install profile" to start using the calibrated ICC profile you just created.

And we're done, that's it.
Almost all the work in calibrating a display is in the setup process, the actual generation of the ICC profile is easy and automated by a tool like DisplayCAL. The default accuracy tolerances used in DisplayCAL are well suited to modern displays and generally you don't need to change much in the application to get great results. Provided you are using the DisplayCAL Profile Loader, this ICC will always be applied at startup to deliver accurate results in supported software.
As we've mentioned in countless display reviews, ICC profiles can only do so much to correct a monitor's performance. If even after setup the display is very inaccurate, the ICC profile will only deliver mediocre results. It'll be better than stock, but not perfect. And there are plenty of applications that don't interact well with ICC profiles either, like some games and non creative productivity apps, so doing as much calibration on the hardware side as you can is always the best approach. As you should expect though, all the big important apps for color accuracy like the Adobe suite, DaVinci Resolve and even Chrome support ICC profiles quite well.
If you do color critical work, we'd recommend re-calibrating your monitor every month or so. Over time the display can degrade and this will impact color accuracy. Rest assured, once you get the hang of the setup process, it's not that time consuming to whack the colorimeter back on and refresh the ICC profile.