I have a Kyocera FS-1020D printer that has printed about 45,000 pages. It now has a problem with aligning the print. When a page prints it begins printing right at the top of the page and is missing the first 1-2cm of detail. THis happens when printing documents from word etc and when printing a test page from the printer. It also happens when the paper is fed from the print tray or the manual paper feed
You are using an out of date browser. It may not display this or other websites correctly.
You should upgrade or use an alternative browser.
You should upgrade or use an alternative browser.
Kyocera FS-1020D print not aligning
- Thread starter davidmrae
- Start date
Jad Chaar
Posts: 6,481 +977
Try installing the most up to date driver software for your PC according to you OS: http://www.kyoceradocumentsolutions...ownload_centre.false.driver.FS1020D._.EN.html
I know for HP, the drivers come bundled with a control center that allows you to align and clean the print heads, check ink levels, etc. Maybe the new driver will come bundled with that type of software. My printer can also clean and align the cartridges from with in the printer itself since it has a touch screen. Not sure if you can do that with yours because of the small screen. You can also take a look at your user manual for steps on how to align the cartridges. Download the manual here if you lost it: http://www.kyoceradocumentsolutions...wnload_centre.false.driver.FS1020D._.EN.html#
I know for HP, the drivers come bundled with a control center that allows you to align and clean the print heads, check ink levels, etc. Maybe the new driver will come bundled with that type of software. My printer can also clean and align the cartridges from with in the printer itself since it has a touch screen. Not sure if you can do that with yours because of the small screen. You can also take a look at your user manual for steps on how to align the cartridges. Download the manual here if you lost it: http://www.kyoceradocumentsolutions...wnload_centre.false.driver.FS1020D._.EN.html#
D
DelJo63
Sounds like a paper feed problem - - the rollers are getting old+hard and fail to pickup the paper immediately but the printing starts correctly and the whole page gets shifted.
prove this for yourself - - set the paper margin equal to the physical limits of the printer (typically 0.5 inch). Now create a page with MS Word and place a BOX around the first paragraph. Type one line until it line-wraps (ie it should print completely across the page) and then hit <ENTER> until you get to the last line that keeps the outline BOX on the first page.
Hit Print - - if the page is feed correctly, you see exactly what you created, otherwise it's a paper feed problem.
Just fixed mine tonight with the help of Google Translate and a german printer forum...
The cause is small piece of foam rubber tape on the registration clutch solenoid, which gets slightly sticky with age and affects the timing of the paper mechanism.
If you're reasonably comfortable dismantling stuff (and reassembling successfully!) it's not hard to fix. It helps to get the service manual, which has nice diagrams of how the parts can be removed - Google "fs-1020d service manual".
Here goes:
Lift out the "process unit" (toner and drum).
Remove the top cover - 2 screws.
Remove the thumbscrews from the rear to get at the option slots.
Remove the right side cover - about 6 or 8 plastic clips (service manual shows where).
Disconnect the 12 cables from the engine board (the one with 12 cables ;-)
Remove the engine board - 3 screws.
Unclip a few wires and remove the light-grey plastic cover (1 screw).
You'll now see 3 solenoids (coils with metal levers attached; mine had the coils wrapped in blue tape). Top right one is likely the main culprit, but probably worth looking at all of them. Take the solenoids off one at a time - 1 screw each.
There's a small piece of 0.5mm foam tape that's supposed to stop the solenoid from clicking too loudly when the magnet pulls the lever in, and it's probably very gooey. I scraped off the goo and replaced it with some foam tape I cut down thin with a razor blade. You could probably just omit it altogether or cover the goo with some adhesive tape.
Reverse to reassemble - good luck!
Hi Adrian123,
Had the same problem. Used your description to get to solenoids.
Instead of scraping off the goo, I just covered it by firmly wrapping a very thin tape around goo + its metal base. Now my FS-1020 works like a charm again.
Thx so much for your very useful + clear description! Great!!
Had the same problem. Used your description to get to solenoids.
Instead of scraping off the goo, I just covered it by firmly wrapping a very thin tape around goo + its metal base. Now my FS-1020 works like a charm again.
Thx so much for your very useful + clear description! Great!!
G
Guest
(y)(y)(y)(y)(y)WOW!!! Thanks so much for your wisdom lol, I've been tearing my hair out with frustration trying to fix this problem, I read your solution and BAM FIXED!!!!, thank you sooooo so much, very happy camper here!!! Thank you!!!!
G
Guest
I got similar issue with my FS-1020D. The printing starts in the middle of paper. I tried to disassemble and I cleaned the solenoids but alignment is still a problem 
G
Guest
Same problem with my FS1030D after 9 years of faithful service. Thought I must have mucked up something in printer settings but whatever I did the printing was out of alignment. Did a Google search and came across this page. I followed the instructions of Adrian123 (instructions apply the same to the FS1030D) and the problem was fixed. I did not scrape off the gooey pads from the solenoids. I just cleaned the metal they come into contact with using a cotton bud (to remove any gooey bits stuck to the metal). I then covered the pads with a thin strip of electrical tape (wrapped the tape around so it hopefully stays in place). Ran off a few test prints and no alignment problem. Thanks very much.
G
Guest
Hey man, I just applied your therapy to my old FS-1200D - took a while to unplug the cables to the board, but they came off. Two of the 3 solenoids had the sticky residue, one quite bad. Prior to this, the pages were printing with about the top 2 inches chopped off. I cleaned the solenoids' where indicated, reassembled it all and it now works perfectly!!
Well done my friend.
Well done my friend.
Just another happy FS-1020D user who found this fix solved my problems.
I thought I would be lazy and just remove all the pads. However note that one of the solenoids uses the rubber pad to hold the arm close enough to the magnet to be moved - if you remove that pad the solenoid will no longer operate. All the other pads seem unnecessary though.
I thought I would be lazy and just remove all the pads. However note that one of the solenoids uses the rubber pad to hold the arm close enough to the magnet to be moved - if you remove that pad the solenoid will no longer operate. All the other pads seem unnecessary though.
Just fixed mine tonight with the help of Google Translate and a german printer forum...
The cause is small piece of foam rubber tape on the registration clutch solenoid, which gets slightly sticky with age and affects the timing of the paper mechanism.
If you're reasonably comfortable dismantling stuff (and reassembling successfully!) it's not hard to fix. It helps to get the service manual, which has nice diagrams of how the parts can be removed - Google "fs-1020d service manual".
Here goes:
Lift out the "process unit" (toner and drum).
Remove the top cover - 2 screws.
Remove the thumbscrews from the rear to get at the option slots.
Remove the right side cover - about 6 or 8 plastic clips (service manual shows where).
Disconnect the 12 cables from the engine board (the one with 12 cables ;-)
Remove the engine board - 3 screws.
Unclip a few wires and remove the light-grey plastic cover (1 screw).
You'll now see 3 solenoids (coils with metal levers attached; mine had the coils wrapped in blue tape). Top right one is likely the main culprit, but probably worth looking at all of them. Take the solenoids off one at a time - 1 screw each.
There's a small piece of 0.5mm foam tape that's supposed to stop the solenoid from clicking too loudly when the magnet pulls the lever in, and it's probably very gooey. I scraped off the goo and replaced it with some foam tape I cut down thin with a razor blade. You could probably just omit it altogether or cover the goo with some adhesive tape.
Reverse to reassemble - good luck!
it works
thank you!Brilliant about 30 minutes to follow the instructions and I now have a top margin again. Love itit works
You dont need to take off all of the 12 cable connectors just the right hand ones and swing the board
out ot the way. The single screw on the grey plastic cover is down a hole in the middle not exposed on
the left. Spent some time looking for the service manual to figure out the side cover clips but in the end
just went round carefully prising with a knife and its pretty easy and nothing breaks off.
Take the top solenoid right off so you can clean it properly. I used the electrical tape over the sticky stuff method and it seems just fine. Thanks very much.
Another big thank you!
My FS-1030D is now printing correctly and doesn't need to be sent to silicon heaven.
Brilliant.
My FS-1030D is now printing correctly and doesn't need to be sent to silicon heaven.
Brilliant.
Thank you Adrian123!
Your post was invaluable in getting my FS-1030D working correctly again.
One extra thing to watch out for, for future reference.
I used these instructions once to get my printer working, but then about a year later the paper alignment started failing again. This time it was usually only the first page of a print job (and occasionally the second) that was affected by the problem.
I took the printer apart a second time using these instructions, expecting some of my pad repairs to have come undone, but all the original pad repairs seemed to still be ok. I had covered the original pads with electrical insulation tape (the good stuff, not the cheap stuff) wrapped twice tightly right around the pad and the metal actuator, and none of those seemed to have come undone, or was sticky again.
Then I found that one of the solenoids (the second down from the top) had a second smaller, thinner pad farther down it's actuator, that I had not noticed before, and that pad had become just a little bit sticky. Covering that pad with electrical insulation tape too, just like the others, has worked a treat. The printer is working properly again now, and hopefully will stay that way.
Thanks Adrian123! I followed your instructions and my printer is working perfectly again. Needed to remove the foam from all the solenoids. I used a knife to scrape off the residues of the foam. Then some oil that is also used for the shredder blades to dissolve the remaining glue and remove it with a q-tip, works well. I cleaned the hard plastic stripe on the other part in the same way and left it on, as it seemed ok after cleaning. Neville Cook writes about that part in the last paragraph of his posting. I think that it was "infected" by the dissolving foam and glue from the opposing side.
Thanks,
I would have never found the problem on my own.
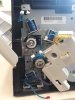
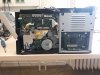
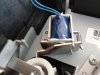
I attached pictures for visual aid, if anyone is still looking for this.
I would have never found the problem on my own.
I attached pictures for visual aid, if anyone is still looking for this.
Attachments
Last edited:
Similar threads
- Replies
- 18
- Views
- 72
- Replies
- 1
- Views
- 122
Latest posts
-
Europeans are starting to see US tech as a privacy risk, survey claims
- gingerbill replied
-
 Meta just launched its own-branded smart glasses for $299
- NumberNine replied
-
TechSpot is dedicated to computer enthusiasts and power users.
Ask a question and give support.
Join the community here, it only takes a minute.