If you've ever needed or wanted free software to handle dictation or to control your PC using voice commands, look no further than Windows 11 itself. Microsoft's latest OS comes with three tools that enable you to fully interact with your computer, entirely through the power of your voice.
The voice features of Windows
Windows 11 has three distinct functions that let you to execute specific actions using your voice. Microsoft tends to use the terms "speech" and "voice" interchangeably, so don't be puzzled if the naming of these functions seems a tad confusing initially.
- Voice Access (VA) is a relatively new system, introduced in the September 2022 H2 update. It enables you to control your PC, as well as input text into documents, emails, and other programs. Currently, it only supports English, spanning six dialects (US, UK, India, Canada, New Zealand, Australia), but language support is likely to expand in the future.
- Windows Speech Recognition (WSR) has been in use for some time and offers significantly better language support than Voice Access. Although it essentially performs the same functions, it does so with fewer features. Neither system requires an Internet connection to function, though Voice Access might need it during its initial setup.
- Voice Typing (VT) is designed exclusively for dictation (i.e. speech-to-text)If you're concerned about your PC inadvertently executing commands while you're speaking, this is the system to use. Like WSR, it supports more languages than VA. However, unlike the other two systems, Voice Typing requires a permanent Internet connection.
Voice Typing operates over the Internet as it leverages Microsoft's own servers for voice analysis. In theory, this should yield superior results in terms of transcription accuracy and grammar. Although this function requires relatively little bandwidth, a slow connection with high latency may result in a noticeable lag between issuing a command and seeing the result on-screen.
Hardware requirements for getting started
A basic requirement is, of course, a microphone before you can issue voice commands to Windows or utilize the speech-to-text feature. If you're using a laptop, your PC most likely has one built in, and the same could be true if you're using a webcam.
However, these devices can pick up sounds from any source near the device. So, unless you're working in a quiet environment, you might find that background noise could interfere with the performance of the speech recognition system.
For the best possible results, using a dedicated headset or free-standing microphone is a good idea. In the case of the latter, the Blue Yeti and HyperX SoloCast are both great choices for the money – just plug them in via the included USB cables and you'll be ready to go.
You'll probably get the best results using a quality headset, as many of the latest models try to eliminate background noise to improve sound quality.
Enabling and setting up Voice Access
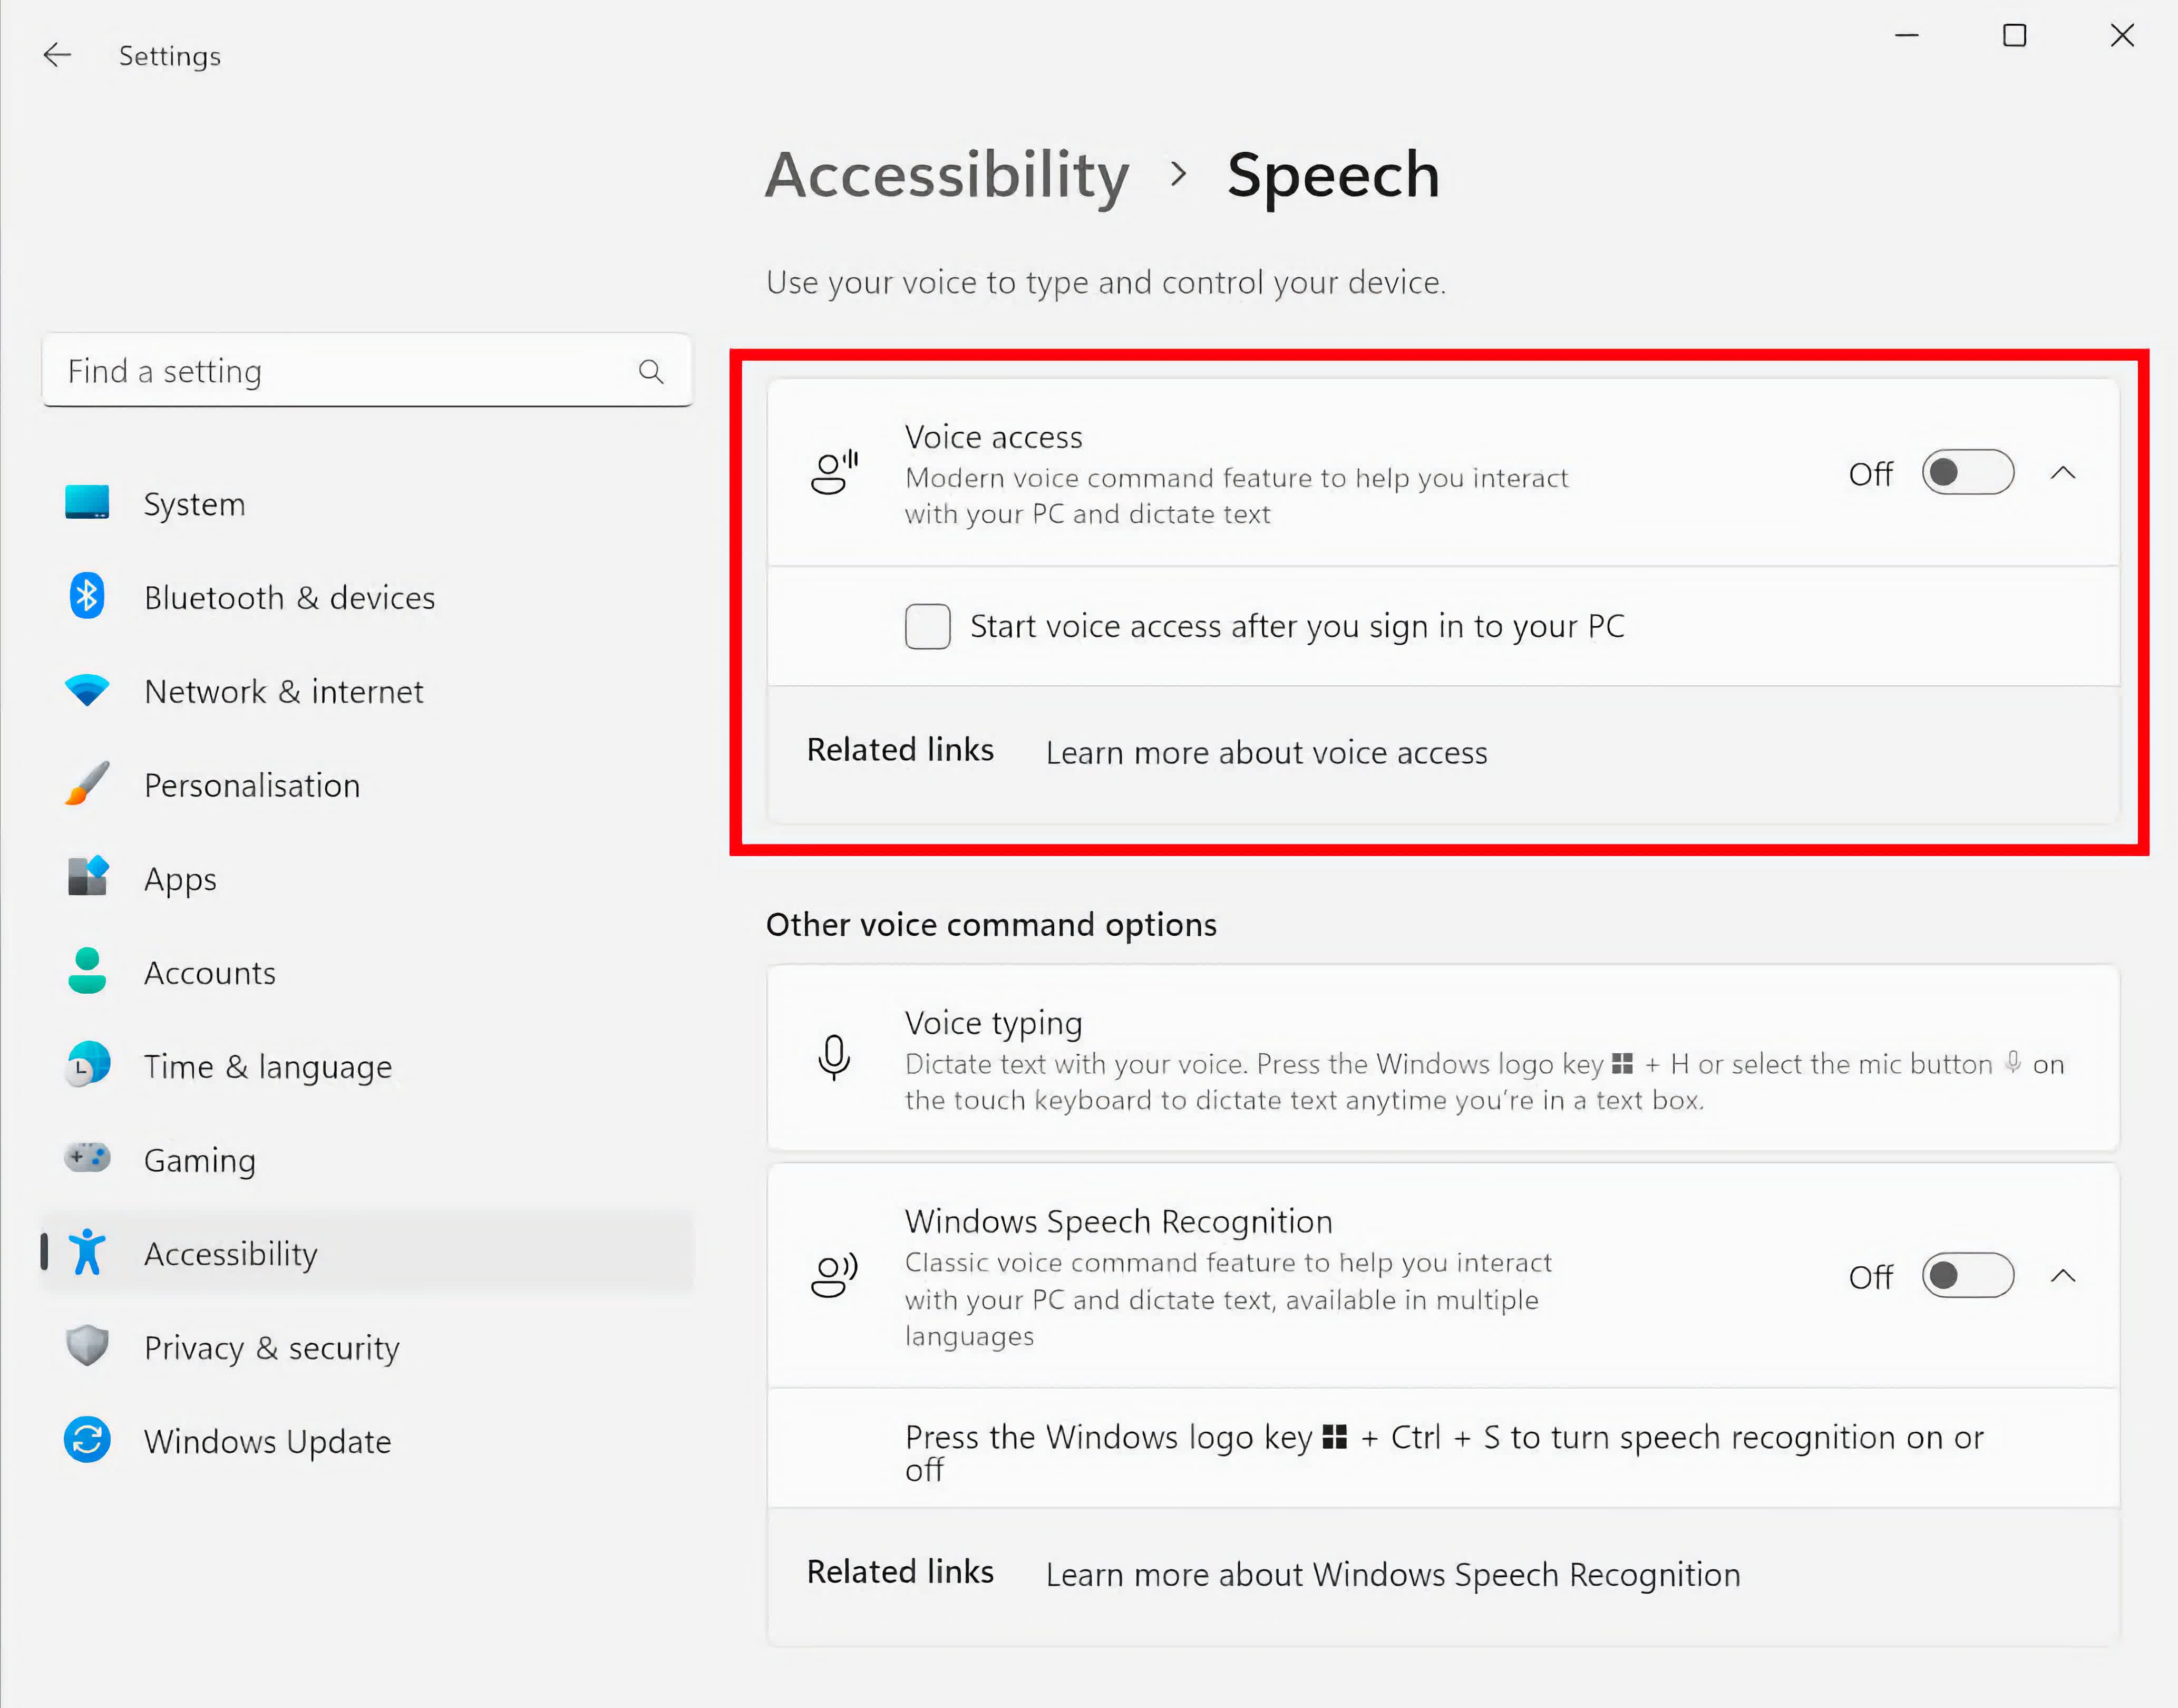
To switch on the new voice control system built into Windows 11, click on Start and go to Settings, then pick Accessibility from the left-hand menu, and then Speech in the Interaction section.
Here you will find a toggle to active Voice Access, along with the option to have it come on when you log into Windows. For the first time you switch the system on, a brief introduction screen will be shown.
There is a tutorial available that introduces you to the basic features. After completing it, you're free to start using the system. Unfortunately, the need to use a mouse or keyboard to set up Voice Access initially can be a challenge, particularly if you have mobility difficulties. However, once this hurdle is overcome, every facet of Windows and many apps can be manipulated solely through voice commands.
While Voice Access is active, a bar is displayed across the top of your screen. Its purpose is to provide visual feedback on the system's activities. The microphone status, along with a transcript of the most recent verbal instruction, is constantly displayed on the left side of the bar; the center of the bar exhibits the command being processed.
The bar is somewhat obtrusive, given its large size in comparison to the amount of information it provides. Microsoft might address this in a future update. If the bar takes up too much space for your liking, you may find Windows Speech Recognition to be a more suitable alternative.
Controlling Windows and apps with Voice Access
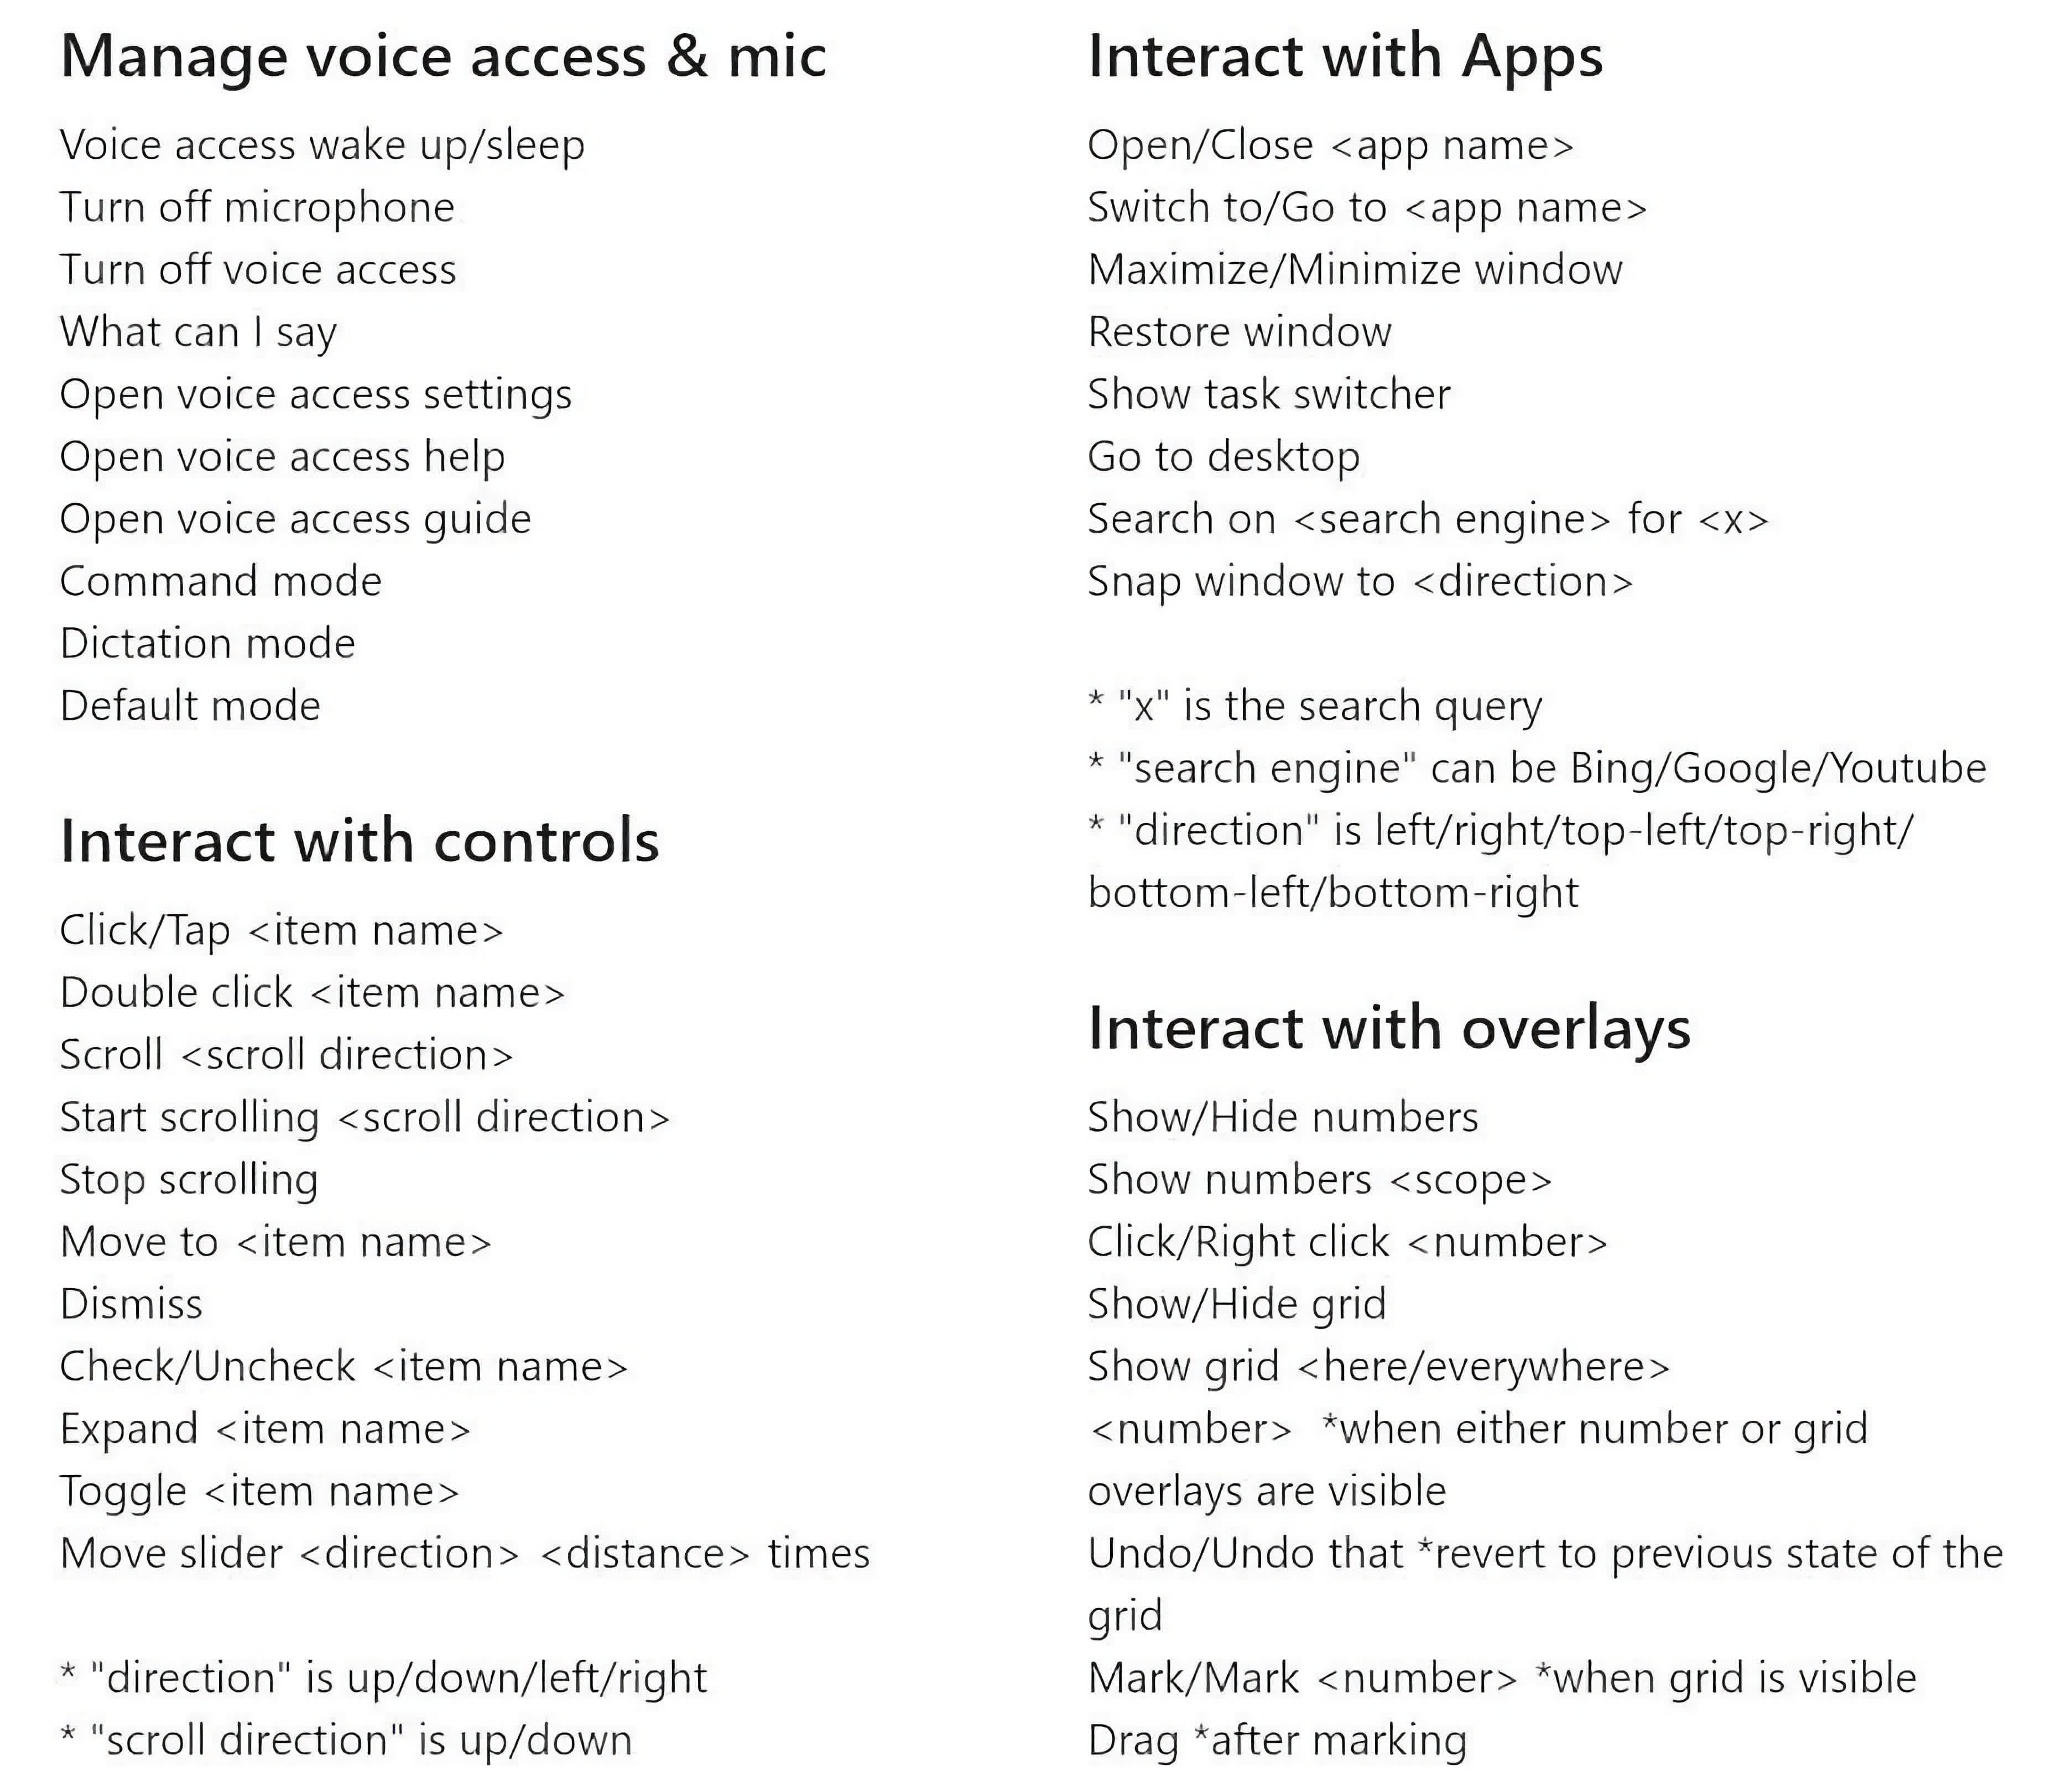
The range of tasks you can accomplish with Voice Access is extensive, and detailing all of them in this article would be unwieldy. However, you can access a summary of the essential commands by simply saying "what can I say?"
For a comprehensive list, Microsoft's own guide is thorough, divided into multiple sections. A notable feature of Voice Access is its intuitive nature – for the most part, you don't need to utter anything overly technical to execute an action.
For instance, saying "open Chrome" will launch Google Chrome, provided it's installed on your system, while "close window" will terminate it. The command "move mouse down" will prompt the cursor to move downward on the screen, and saying "stop" will halt its movement. Keyboard usage is equally straightforward – for example, the command "press control shift v" will execute that specific key combination.
Bear in mind that you can't issue commands in a conversational manner; instructions should be clear and concise. The quality of your microphone's output can also influence the accuracy of Windows' interpretation of your commands.
For most people, transitioning from using a keyboard and mouse to a voice control system might not be a walk in the park – progress could be slow at first. However, over time, certain actions like opening applications, switching between windows, and selecting screen icons will become instinctive.
Voice Access is especially beneficial for users with mobility difficulties, or for anyone seeking to give their hands and wrists a rest. It's a truly valuable system.
Using Windows Speech Recognition instead of Voice Access
To activate the older voice control system, press CTRL, Win Key, and S simultaneously on your keyboard. You can also access this feature in the same area of the Settings where Voice Access is located.
The first time you use this key combination, Windows will initiate a brief configuration wizard. Once completed, the same keys will merely toggle the system on or off, although you can configure it to automatically turn on when you log into Windows.
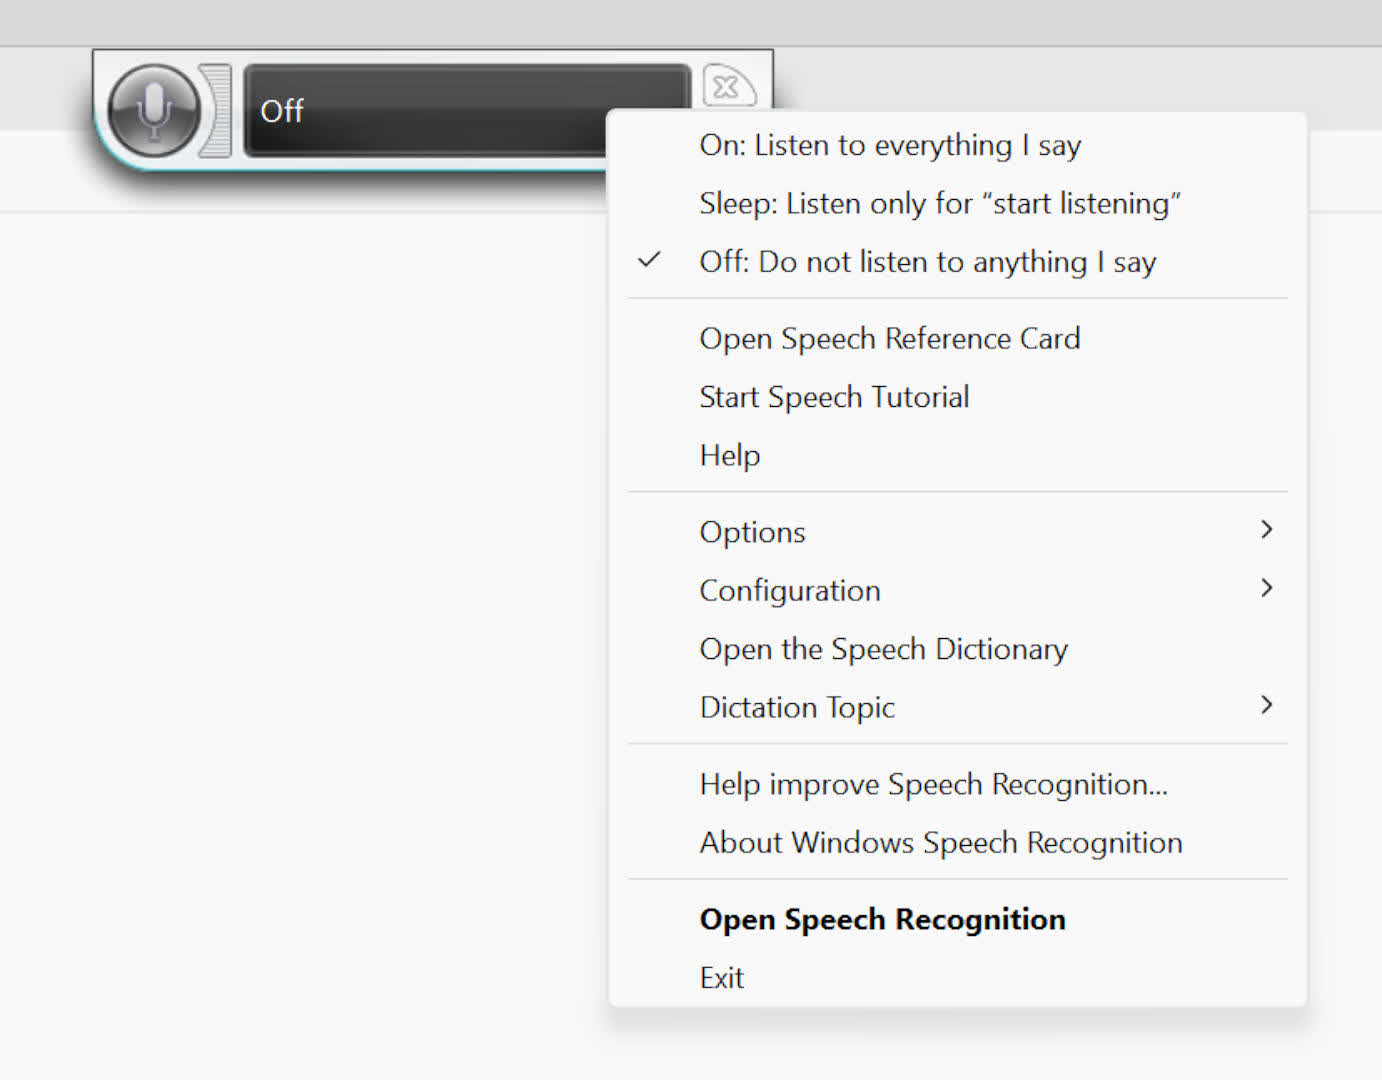
While operational, Windows Speech Recognition displays a small widget that you can dock at the top or bottom of your screen, or position in a free-floating manner. Similar to the Voice Access bar, it provides visual feedback on received and executed instructions.
WSR has more configuration options than VA, but essentially it functions similarly to Voice Access. However, it has fewer commands, particularly concerning precise mouse/cursor control. Despite this, the system works quite well, and as previously mentioned, Windows Speech Recognition offers extensive support for multiple languages.
If language compatibility isn't an issue for you, or if you aim to maximize control over your PC, you may be better off using the newer system.
Dictation with Voice Typing
One of the coolest things you can do with voice control in Windows is dictation – the conversion of what you're saying into text on the screen. Both Voice Access and Windows Speech Recognition provide this function and it works automatically if the cursor is already present within a text field, such as the address bar in a web browser or a page within a text document.
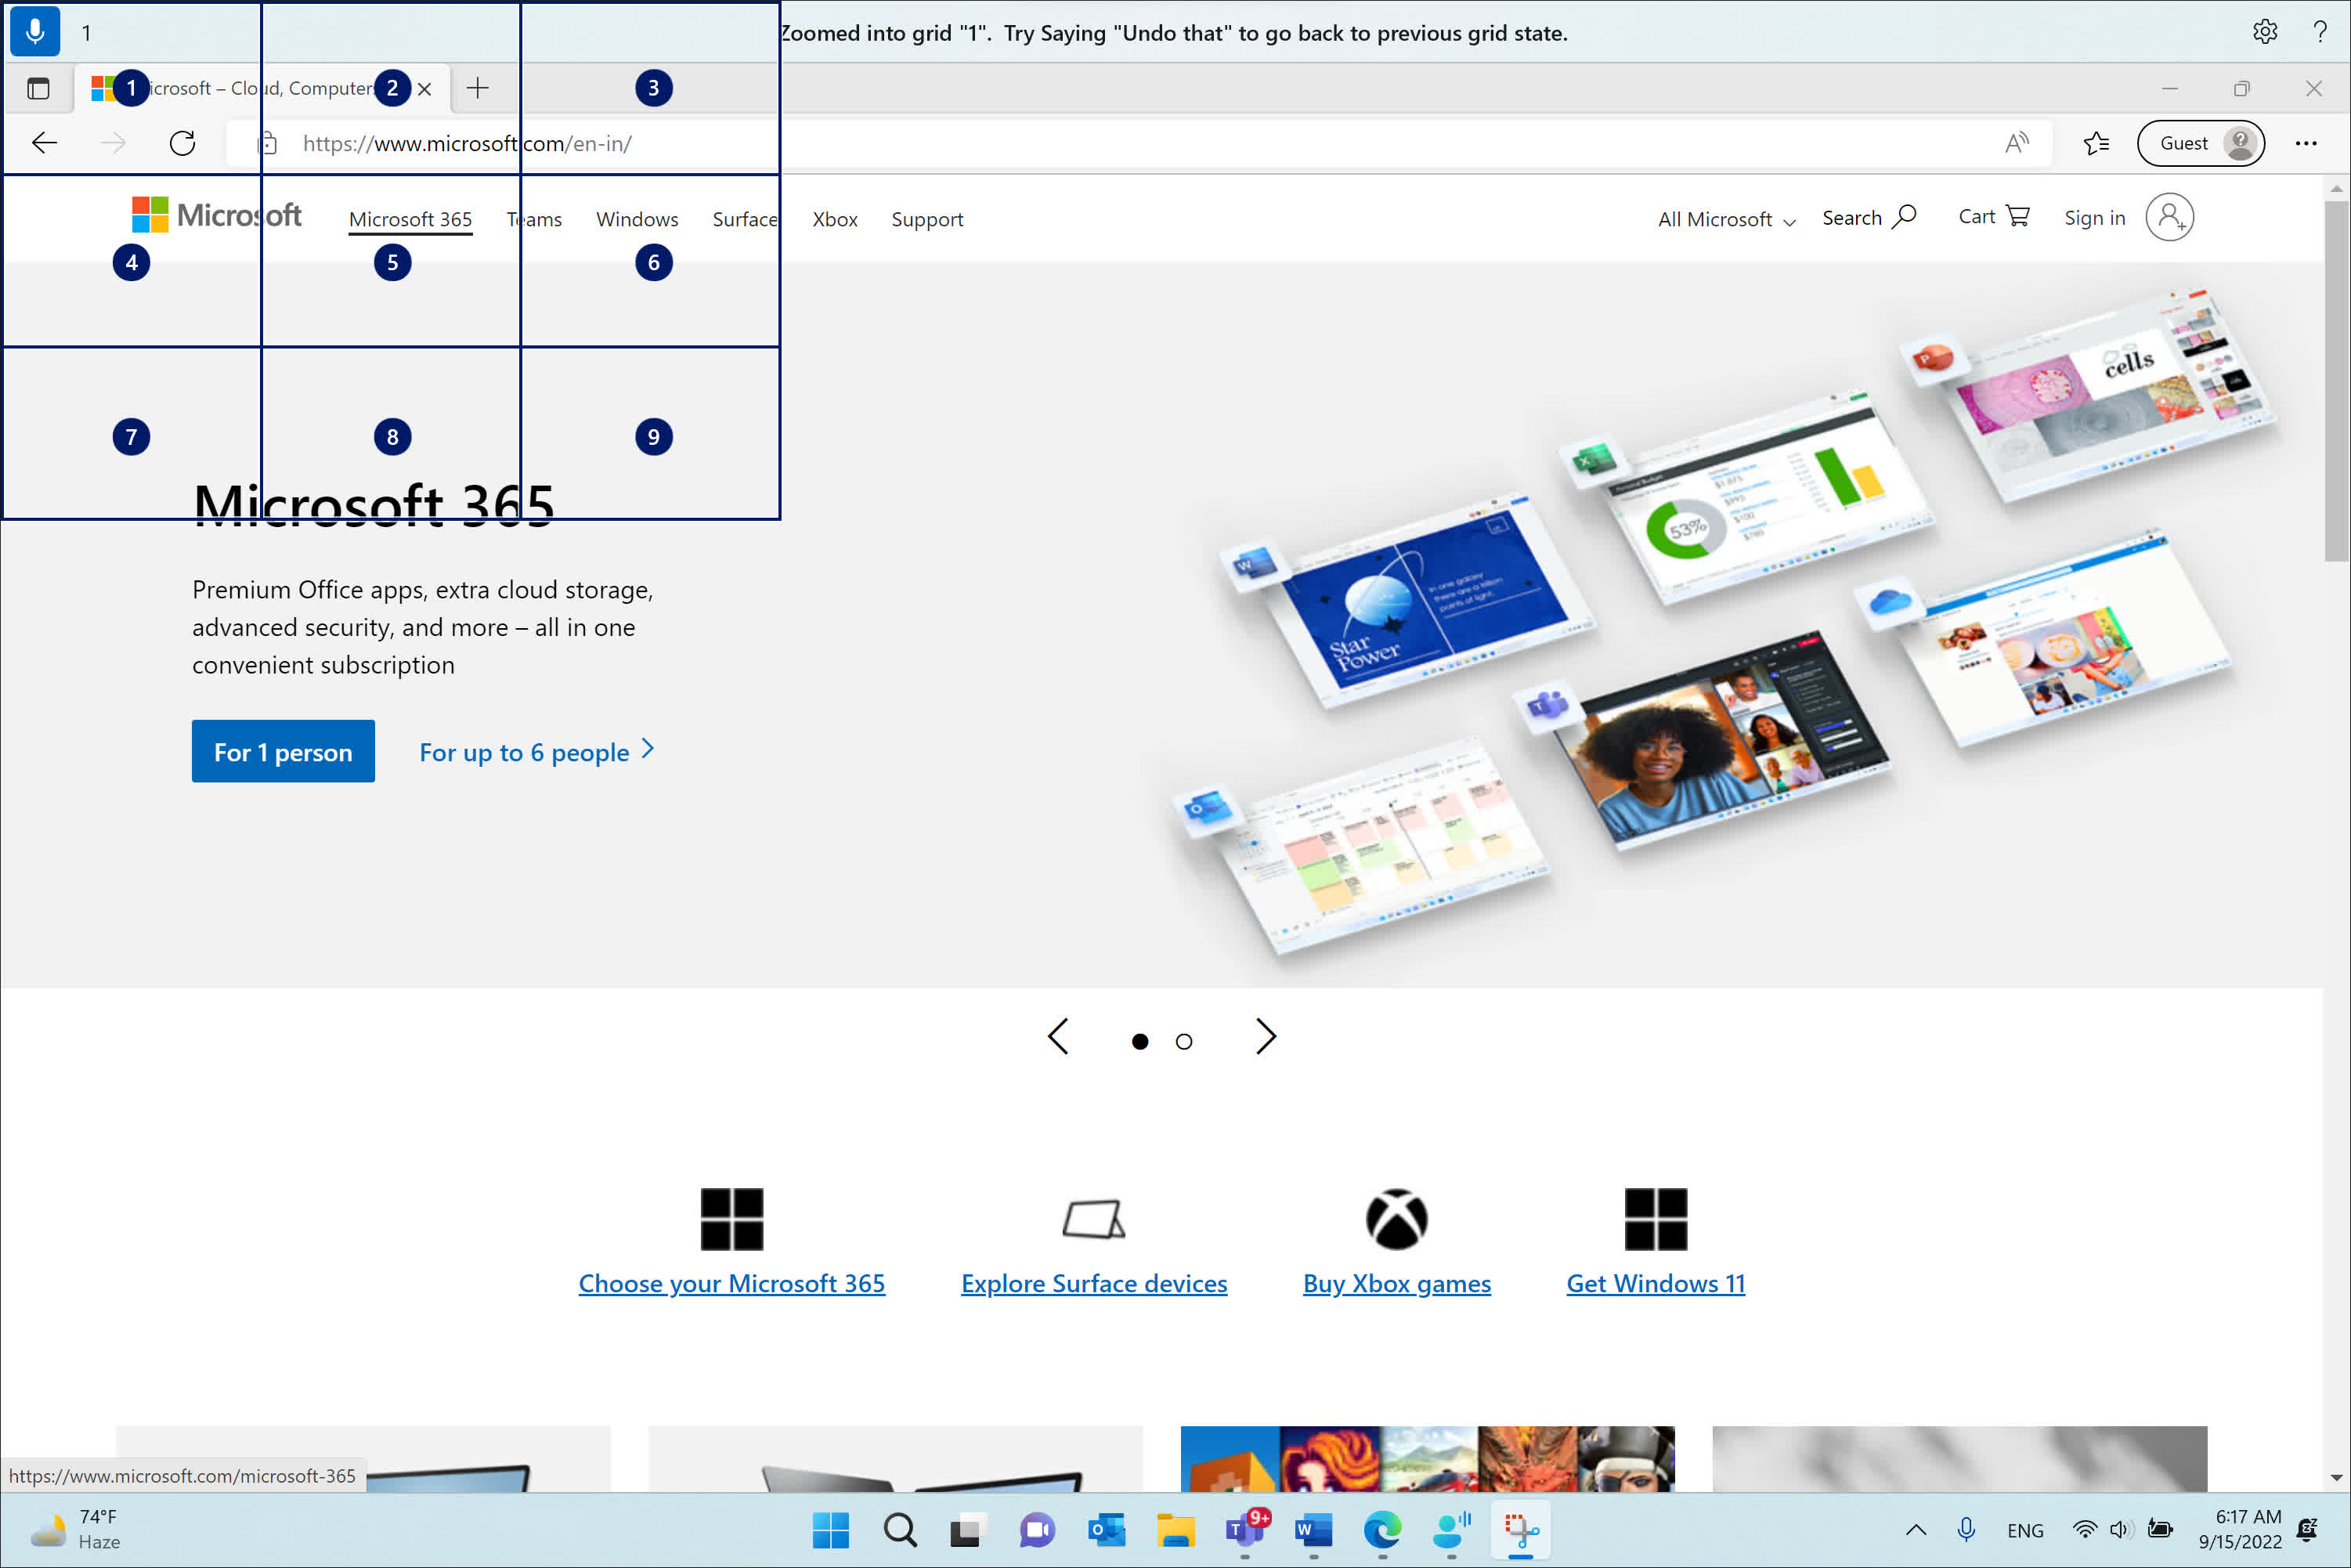
You will need to move the cursor to an appropriate part of the screen. If you're using Voice Access to do this, say "show grid" (or "mousegrid" in WSR), followed by the number corresponding to the area you want to navigate to. Repeat this sequence until the grid centers over your target, then give the command "click".
Now that the text field is selected, you can start dictating. Windows will convert your speech automatically, but by default, it doesn't add punctuation. To enable this, click on the Settings icon (a small cog) in the VA bar at the top of your screen. Select the middle option, and you'll see the ability to enable automatic punctuation (and a profanity filter, if desired).
If you need to enter a VA/WSR command as a line of text, precede it with the word "type". If you don't, Windows will interpret it as a voice command.
If you want to use dictation without enabling Voice Access, you can use Microsoft's Voice Typing feature. This does require an active Internet connection, but it's easy to enable – simply press the Win key + H together. A small widget will appear near the bottom of your screen; clicking on this will activate Voice Typing.
Voice Typing supports a wide range of languages. Naturally, you'll need to have the corresponding language package installed before using it in VT. Compared to Voice Access and Windows Speech Recognition, Voice Typing has relatively few commands, most of which pertain to punctuation.
Microsoft designed this tool to supplement the use of a keyboard and mouse in document creation, not replace it entirely. If you're a slow typist or find extended typing sessions to be uncomfortable, Voice Typing is an excellent productivity booster without the learning curve of a complex new system.
All three tools – Voice Access, Windows Speech Recognition, and Voice Typing – enhance Windows 11's accessibility and mitigate repetitive stress injuries from prolonged keyboard and mouse use. Even if you believe you won't need these features, it's worth trying them out for a fresh perspective on interacting with your PC.


