Toolbar Setup
Firefox features a highly customizable user interface. The Toolbars can be altered so as to better suit your needs and reduce clutter. By default the Toolbar layout will appear similar to the beneath.

By selecting View, Toolbars you can select the toolbars you wish to have visible (Ticked). The standard ones available are Navigation Toolbar and Bookmark Toolbar. Personally I disable (Untick) both.
Now select View, Toolbars

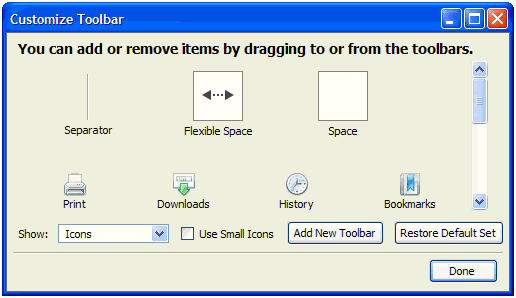
Toolbar buttons. The list here can be used to select buttons to Add to the toolbar. With the right-hand list you can re-arrange currently visible buttons or Remove unwanted ones.
Show. This option specifies how descriptive text for toolbar buttons is displayed (The text is indicated in the Toolbar buttons section):
- Icons and Text. This sets that descriptive text should be displayed beneath all toolbar buttons. Toolbar size is greatly increased when using this option.
- Text. This sets that descriptive text only is displayed, e.g. Reload. This provides a vertically smaller toolbar.
- Icons. This sets that no descriptive text is to be displayed. This provides the smallest toolbar and is recommended once you know what the buttons displayed do.
- Use Small Icons. Tick this option to use smaller sized toolbar icons, as compared with the default (Unticked) versions. The advantages/disadvantages of each size should be apparent enough.
Pressing Restore Default Set will restore the default installation options for the toolbar, if necessary. Once finished, press the Done button. Pictured beneath is the current toolbar setup that I use, as you can see, it's a lot smaller than the initial setup and contains only the buttons that I need.


