
Advanced Settings Tab
This section is divided into different sub-tab's, which will be covered from left to right, starting with the General tab.
General
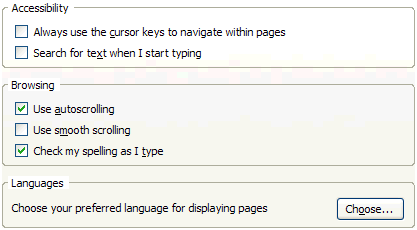
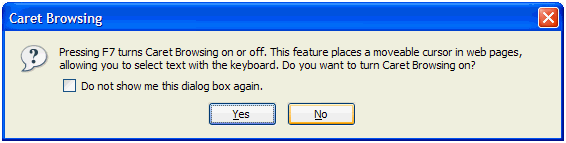
Always use the cursor keys to navigate within pages. More accurately known as caret browsing, Ticking this option allows the keyboard to be used for text selection and is essentially an accessibility aid. If you don't require this feature, which most shouldn't, then leave this Unticked. For convenience you can toggle caret browsing by pressing the F7 key.
Search for text when I start typing. Ticking this option enables you to Find in this page (i.e. the current webpage) by typing letters, eliminating the need to manually start Find in this page (e.g. by pressing Ctrl + F). Unticking this disables such automatic initialisation, which you might find to prove less troublesome (As searches will only occur should you want them to).
Use autoscrolling. Autoscrolling is the function whereby if you click/depress the middle mouse button (Scroll wheel more commonly) you can scroll up/down the page by moving the mouse up or down. You can determine if it's active by the following icon appearing;
![]()
If you wish to enable Autoscrolling then Tick this option, otherwise Untick it to disable it.
Use smooth scrolling. Tick this option to enable smooth scrolling of webpages, whereby Firefox slides smoothly up/down a page rather than jerking up/down (Unticked).
Check my spelling as I type. Ticking this option enables Firefox to check the spelling of text entered into multi-line forms on webpages in real-time; underlining errors as detected. Right click on detected entries for spelling suggestions, or to add to the dictionary, etc. Dictionaries for additional languages can be found at Firefox Add-ons. Untick this option should spell checking be of no use to you.
Languages. Clicking Choose allows you to specify the priority for languages installed for webpages that are available in different languages. As with the Fonts and Colors options, this isn't something there's any particular reason to need to change, leave it alone if you can.
Now select the Network tab.
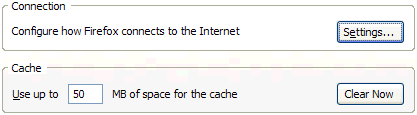
Configure how Firefox connects to the Internet. Clicking the Settings button allows you to configure Proxy server settings for Firefox to use. You'll need to consult your ISP or network documentation for specific settings if necessary. For most people out there though Direct connection to the internet should suffice.
Use up to X MB of space for the cache. This field specifies the size, in MBs, of the disk cache folder. This is used to cache all data for the webpages you view. Should you visit certain websites repeatedly this cache can improve loading times as data for the webpage may already exist in the cache. That said, there's no point going nuts with this setting and setting aside a large amount of space - it's merely intended as a temporary cache. Though this may vary depending on how many repeat viewing webpages you visit there should no real need to set aside more than 1 or 2 dozen MBs for this. Personally I use just 10MB. As discussed later, Firefox also checks for newer versions of cached data so there is no need to store too much anyway as you'll probably be downloading newer versions regularly.
Clear Now. Clicking this button will delete all cached browser data on the hard drive (Except cookies). You should consider doing this every once in a while to remove unneeded cached data (From a webpage you once visited once for example).
Now select the Update tab.
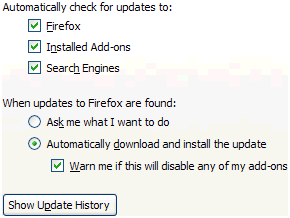
Automatically check for updates to. This option allows you to specify which components Firefox can automatically scan for available updates to at regular intervals. There's no real reason to Untick any of these options as newer versions are likely to contain improved features or fixes for specific issues, in particular security vulnerabilities. Leave all 3 Ticked.
When updates to Firefox are found. This option allows you to specify the action to be taken in the event updates for Firefox are available, 2 options are available;
- Ask me what I want to do. Selecting this option allows you to determine the action to be taken when an update is available, i.e. install or don't install. This is recommended where you want to have control over changes to Firefox, e.g. you may prefer to want on installing updates to ensure no unmentioned compatibility problems arise.
- Automatically download and install the update. Selecting this option enables Firefox to automatically download and install any available updates. This is recommended for hassle-free Firefox maintenance and will ensure the latest security and other updates are installed when released.
- Warn me if this will disable any of my add-ons. Ticking this option enables Firefox to prompt you where a Firefox update available will break compatibility with any installed Extensions/Themes. In such cases you may wish to wait for a compatible Extension/Theme to be released, or to install the update regardless.
Show Update History. Clicking this button allows you to view your update installation history.
Now select the Encryption tab.
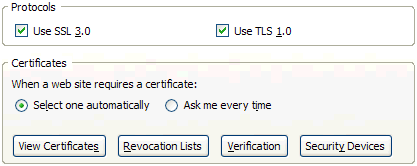
Use SSL 3.0, Use TLS 1.0. SSL 3.0 is an updated version of SSL 2.0 and provided new ciphers and encoding schemes (Along with other changes). TLS (Transport Layer Security) 1.0 is essentially an updated version of SSL 3.0. These are used to provide secure access to secure websites, with digital certificates issued by certifying authorities to the sites to allow their identity to be verified. These can be viewed by double clicking the lock icon that displays in Firefox when accessing a secure site. Both of these options should be enabled (Ticked) at all times. Note - SSL 2.0 support has been disabled in Firefox 2 and other Internet Browsers for security purposes (and is something I myself have been recommending in guides for some time).
The remainder of the options in this tab (Certificates section) can essentially be ignored as there should be no real need to alter (Or even view) them; they are configured fine as is, although I may cover them in a future update if warranted.
This concludes our foray into the Options menu. Click the OK button to exit once finished adjusting options.