A couple of things to note, 'Learninmypc', about your PATA (IDE) HD transplant.
What you need to do depends on what your
current PC uses for it's HD.
Is it of the newer 'SATA' type ?
If it's of the older PATA (IDE) type, you can attach it to one of the wide ribbon cables, plug in a power plug (red/black/yellow) and don't plug a jumper onto the select pins, and you should see it appear as hard drive 'D'.
But if your current PC uses a SATA HD, then you have 2 choices.
1) Buy a IDE-to-SATA interface to plug into the old HD to let you plug it into your motherboard as a SATA HD.
or;
2) Buy an external HD enclosure to fit your PATA HD into, and that will have a USB 2 plug. (This option would let you use it on various PC's).
The jumpers are the tiny clips that go over pairs of pins on the
section with 9 pins.
These are only used on PATA/IDE HD's, the normal situation is; 'C' drive is
master, and has a jumper on 'master' pins, second HD (
the slave) has no jumper at all.
The diagram on the hard drive label shows what goes where, but I have seen many variations so it's not easy to give you exact answers. I will post some photo's if reqd, or;
http://paulski.com/zpages.php?id=2104
This shows some good close-ups of what you are trying to do.
* But your second photo "hddpins.jpg" shows the back of your PATA/IDE Maxtor HD with no jumper, and that's ok as it is.
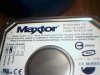


")