PCG-FRV37 CPU installation

Upon dismantling my laptop I discover that the cpu is pasted to a copperish sheet which is in turn attached to the underside of the fan housing. I'm assuming the three pieces are connected with thermal paste.
I am having trouble reseating the cpu while attached to the fan so I wanted to dismantle it and seat it and reattach to fan housing with thermal paste.
Am I on target here with my thought processes or is there something tricky in this manuevering I am overlooking or ignorant of?
 
I'm not sure about your laptop specifically -- I've probably even taken one of these apart at some point but simply don't remember -- but most look like this: You have fan(s) connected to a heatsink(s) with copper heat pipes connecting the heatsink to a thin copper block that sits on top of your CPU.

Both the CPU and heatsink(s) are removable so you should not have any problems. The thermal compound manufacturers use becomes thick, plasticky and can be difficult to remove. Some alcohol and/or thermal compound remover works wonders.

Occasionally, thermal pads are used instead of compound but typically for GPUs, not CPUs. I haven't seen a thermal pad on a CPU in quite some time. In these cases, it is sometimes necessary to replace it with either another pad or a copper shim (recommended) to make sure the heatsink is pressed firmly enough against the CPU to be effective.
 
Vaio PCG_FRV37 cpu fan

So do I pry up these cpu and copper heat sink or just slowly drop alcohol to loosen the compound? On the reverse side to reseat the cpu since the pins were bent on removal ( not expecting this type of setup) I have to try and straighten the pins...sink the cpu and then layer the compound, heat sink, compound then fan housing on top. Am I on track here? I've attached a pic of the fan. I could just sometimes kick these designers that make it more difficult for us....
 

Attachments

  • DSCF0004.jpg
    DSCF0004.jpg
    129.3 KB · Views: 2
The CPU *shouldn't* have come off like that, but obviously it did, so what can you do? :)

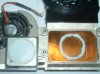
The bent pins can be a pain, but it doesn't look too bad judging by the photo. The CPU socket itself is ZIF (zero insertion force) so ideally, with the socket in the unlocked position, the CPU should fall right into place without any pressure.

The socket will typically have a slotted dial (looks kind a plastic, flat screw head) or a lever that locks it into place. In the unlocked position, the CPU will fall in and can be removed very easily.. in the locked position, the CPU will is almost impossible to insert and tought to pull out (although it'll still come out, even if it is locked... as you may have noticed).

You should be able to pry the CPU from the heatsink. I've had to do this before and I've actually done it with a flat head screw driver... I know that sounds questionable (and it is), but you'll have to use your best judgement. I prefer to use nylon and plastic tools when available, but I know that isn't always an option. If you can find some sort of plastic pry-bar like item, you should be able to safely remove it. The thermal compound used by manufacturers tends to harden into that plasticky material I mentioned above and occasionally it requires some force to separate it from the heatsink. You shouldn't have to strain yourself though.. it should just be a matter of leverage and firm pressure.

If you can get the two separated, clean the surfaces of both really well with some alcohol, seat the CPU into the unlocked socket, lock the socket, apply thermal compound as you like (i usually just put it on the heatsink), plop the heatsink down and affix your fan. You should be good to go.
 
Vaio PCU

Thanks Rick! You gave me some info I didn't figure out. I saw that the cpu didn't have the usual lever type release so I was wondering about the change in design. The glued CPU also explains why it was so hard to take the fan out. Now that I know I don't have to remove the copper shim that also give me more courage now to tackle this within the next day or so.
Yea I read about the compound manufactures are using that turns into a semisolid mess. I am prepared with Artic Ice. I'll give you a thumbs up if all goes well. thank you again......and if I don't *see* you.....

Happy Holidays to you.
 
cpu picture from factory glueing

Here is a picture of how the cpu was adhered to the fan...it's little wonder the bottom of the laptop felts so hot..its wonder though I never noticed any heart related problems. Although there would appear to be plenty of heat past on the cpu one can discern the actual contact pattern on the heat sink. tsk ..tsk....
 

Attachments

  • DSCF0004.jpg
    DSCF0004.jpg
    84.5 KB · Views: 2
Back