For countless people working in business, education, and entertainment, the most commonly used tool to create a presentation is Microsoft's PowerPoint. It's easy to make something quickly and simply, and it doesn't take long to get comfortable using it.
But if you're looking to really master it, and get the most out of the application, join us as we take a quick look at some of the top 10 shortcuts, tips, and hacks that will help you on your way to becoming a PowerPoint pro.
All the tips and tricks listed are for the latest Windows version of the PowerPoint application – for macOS and web users some of the features might not be present or may look a tad different...
1. Press F5 to quickly go live
To launch a presentation, don't bother trying to click the tiny icon in the bottom right-hand part of the screen, or using the menu (Slide Show > From the beginning...). There's a much simpler way to do this.
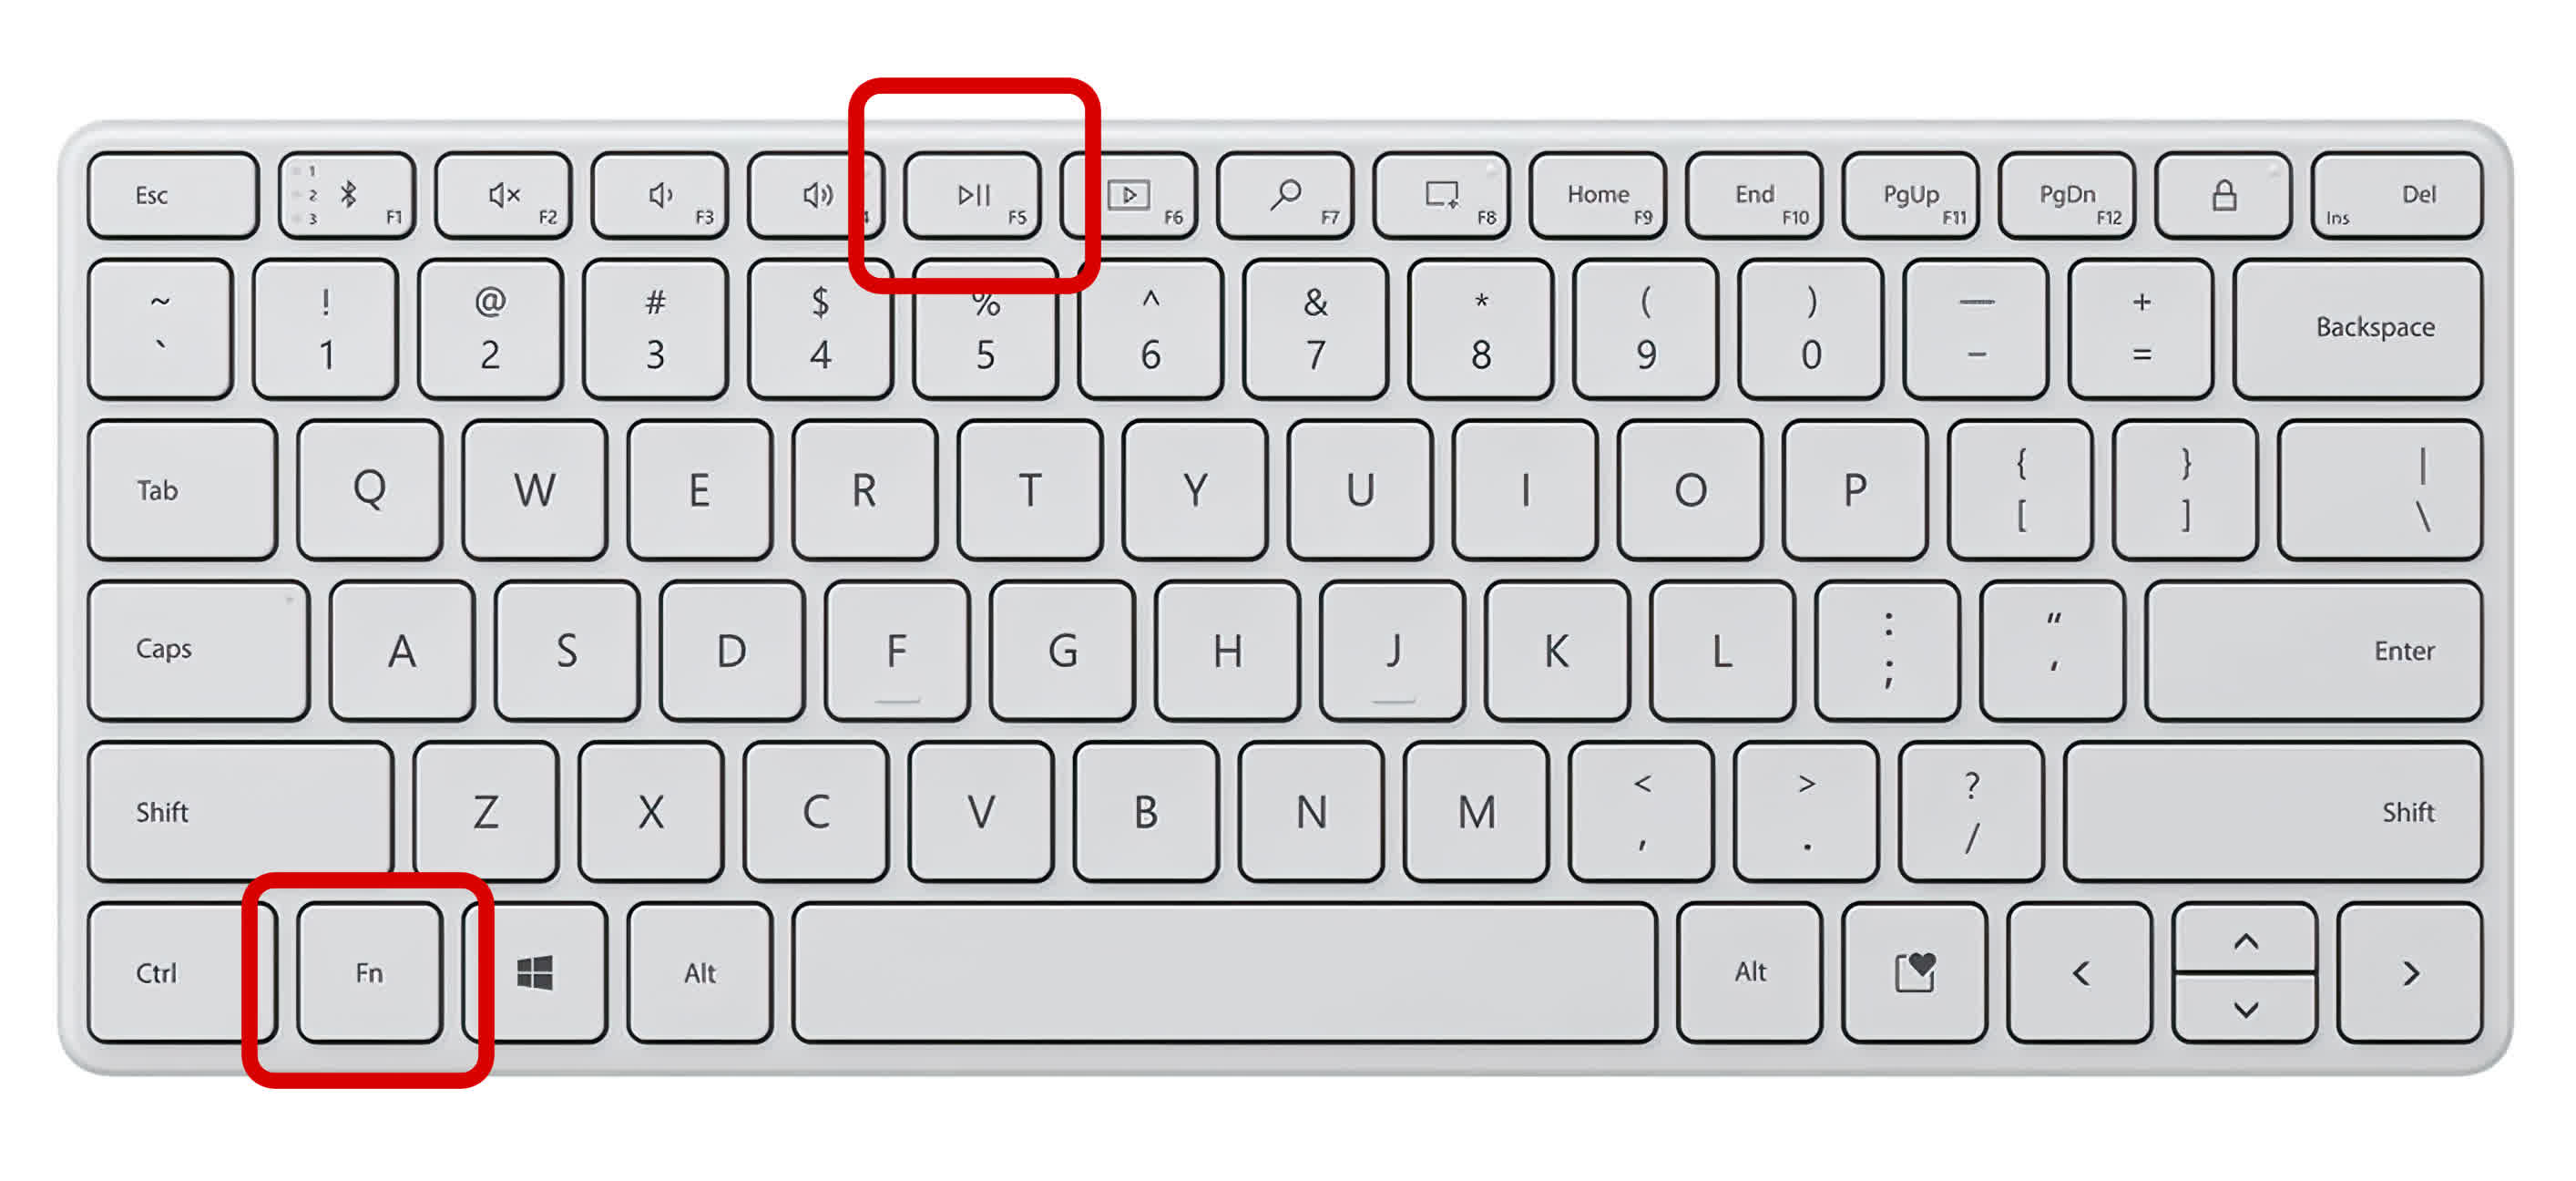
Just press F5 on your keyboard!
By using a simple keypress, you'll look like a total pro – especially if you're having to use an old laptop, with no mouse or a wonky trackpad. Some machines, though, will need you to hold the Function key (Fn) before you hit F5.
If you need to start a presentation at any place in the list of slides, select the one you want to start from and press Shift + F5. Going live has never been easier.
For macOS, it's Cmd + Shift + Return instead of F5, or Command + Return for the equivalent of Shift + F5.
Of course, there are lots more keyboard shortcuts, one for almost every single operation in PowerPoint. There are way too many to list here. Microsoft has two important sets of shortcuts, though – ones for creating presentations, and those for showing them.
But just as with all Microsoft/Office applications, simply pressing ALT will display the keys you need to press for a certain function or process.
2. Snap elements to a grid using guides, and rulers
For getting all elements in a slide lined up correctly, don't waste time moving everything about the mouse or arrow keys. Instead, enable the Snap to Grid function.
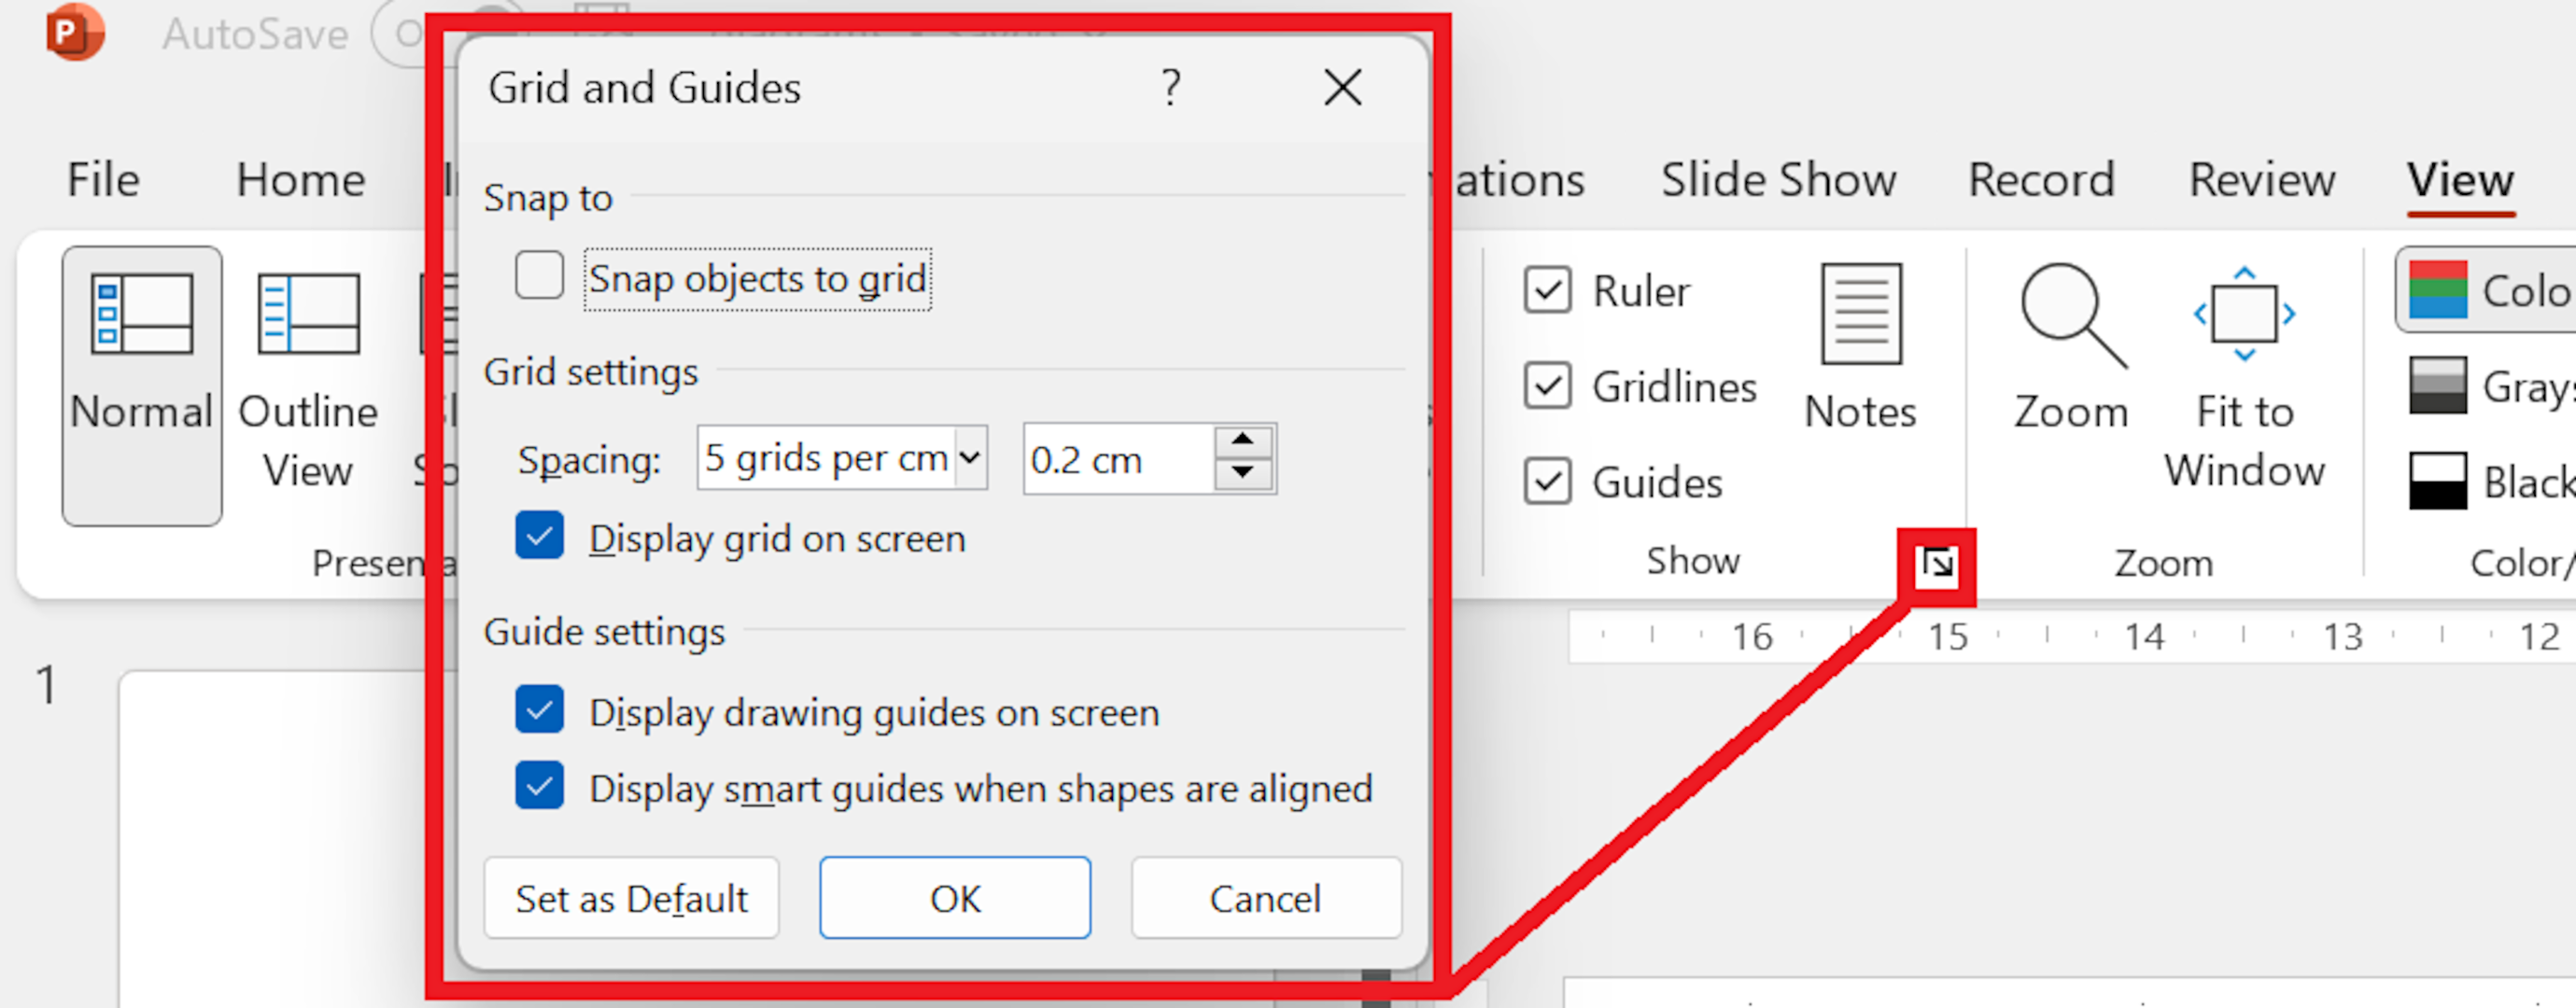
Head to the View menu and tick the boxes for the Ruler, Gridlines, and Guides – you should see lots of lines on your slides which helps with alignment and positioning. But if you then click the small menu icon, just below where you enabled the Guides, a new window will appear.
Here you can enable Snap objects to grid, which means when you now move objects about, they will automatically lock onto the nearest gridline. You can also set a custom number of gridlines per cm – the default is 6 but you change it by using the drop-down menu or changing the gridline spacing (as shown in cm).
The smaller you make this number, the more gridlines you'll get per cm.
If you find that an object, even with snapping enabled, isn't exactly where you want it to be, click on the object and then nudge it about by holding the CTRL button, while you press the arrow keys.
3. Copycat the professional way
We're all familiar with CTRL + C followed by CTRL + V to copy and paste text and objects in a PowerPoint slide. But when it comes to making multiple copies of the same shape to create a symmetrical pattern, there are some extra tricks worth knowing about.
Normally, when you copy and then paste an object, the new one overlaps the original shape. Normally, you'd then go about moving it into the right position, using the mouse or keys. Here's a much better way – click on the shape you want to copy, then hold the CTRL + Shift keys down while you click and hold the mouse button on the shape.
Slide the mouse to the side or up/down, and you'll notice a new copy is automatically made and it is precisely aligned with the previous one! No more trying to nudge shapes about to make them line up.
Even better, once you have done this, just press CTRL + Y to repeat the process – the spacing and alignment gets copied across, making it a piece of cake to create a perfectly symmetrical collection of objects.
4. Breaking smart for better art
There's a good selection of default shapes that you can add to slides but there's also a surprising lack of creative flair about them. If you want to use something better, but don't want to go through the hassle of trying to make your own, then one solution is to break apart SmartArt shapes.
Take the standard block arrows, for example – they are pretty boring to look at and you're very limited in what you can do with them, so let's fix that now.
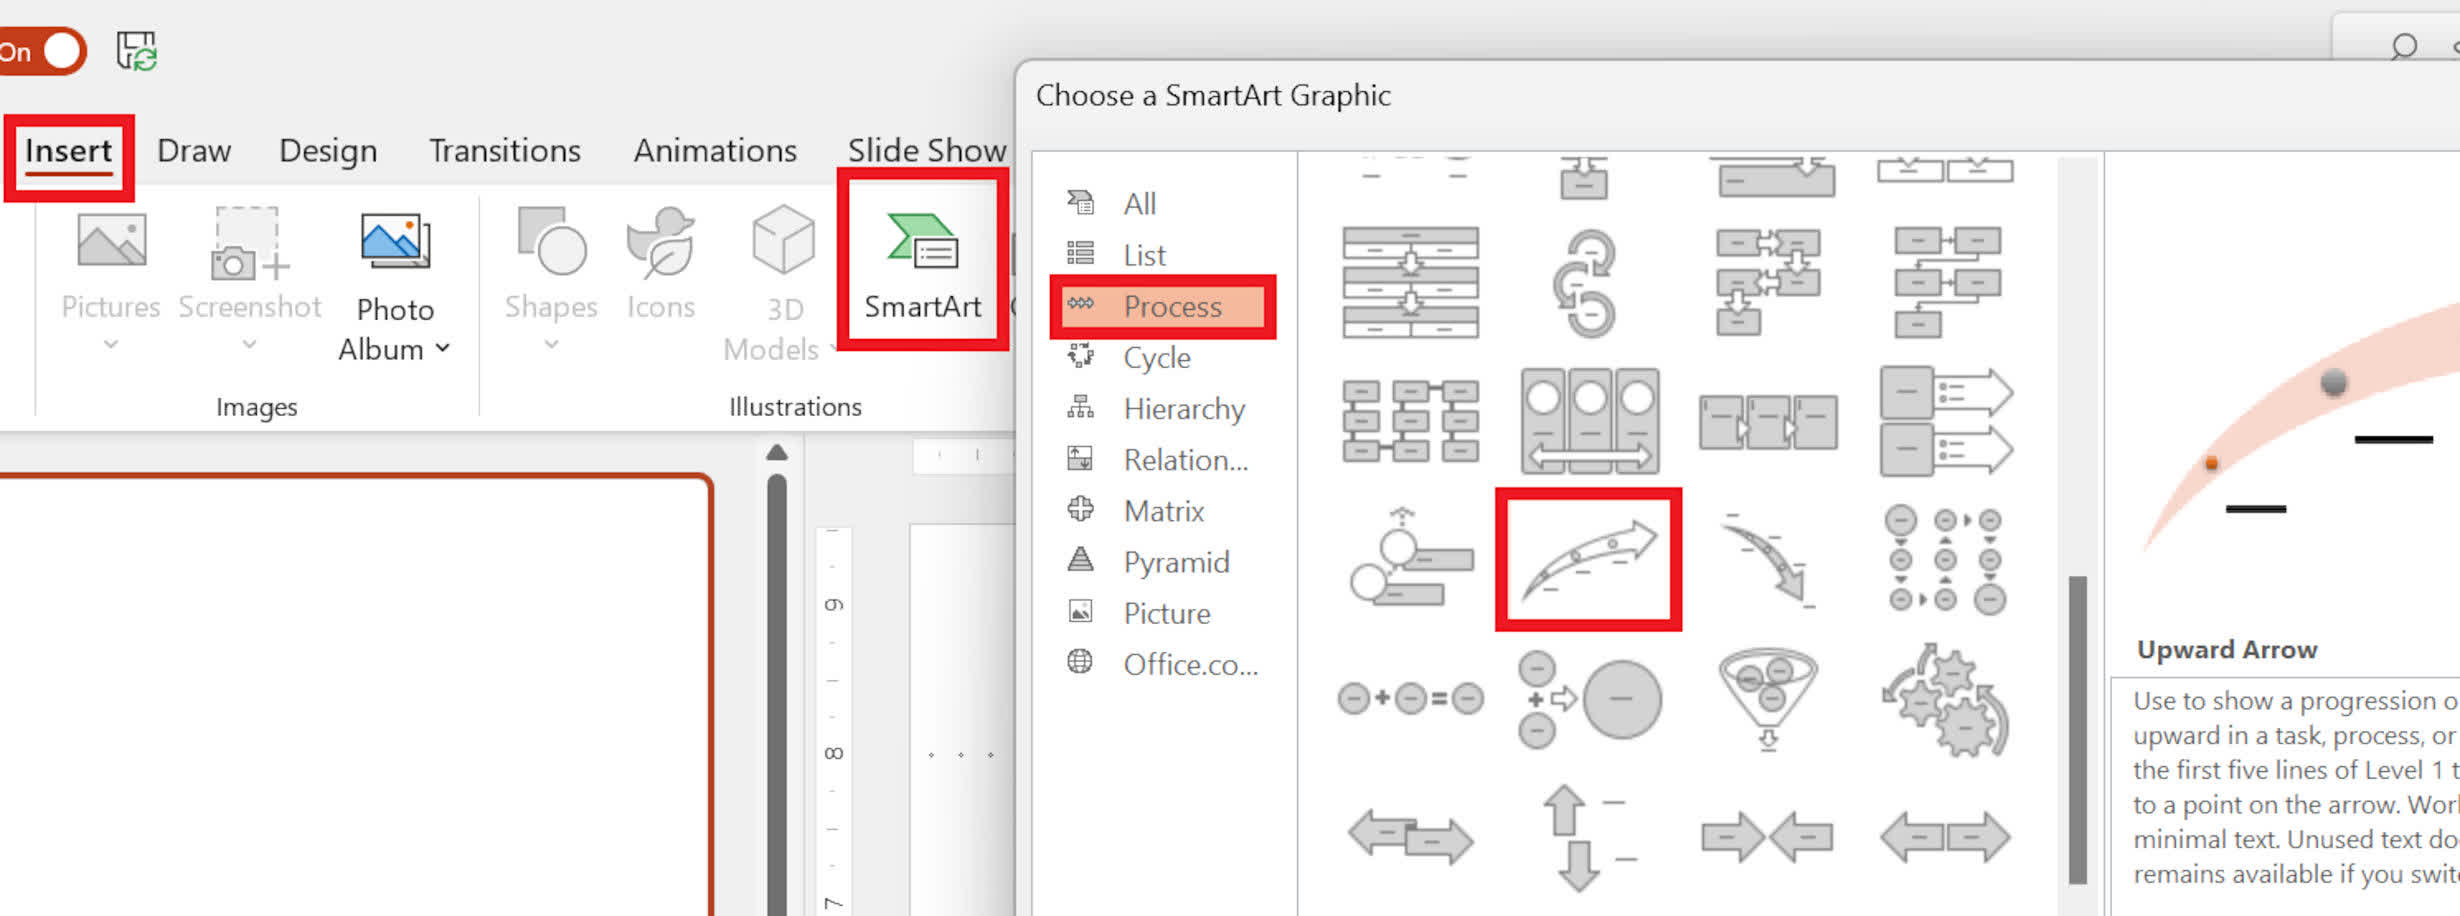
Go to Insert > SmartArt > Process. Now scroll down the menu and select the Upward Arrow option.
Once you've clicked on that, you'll see a cool-looking arrow.
However, it's surrounded by lots of elements that you may not need.
Right-click on any empty part of the newly inserted shape, go to the Group option in the menu and select Ungroup. Do this a second time and then press CTRL+A, to select everything in the slide – or drag a highlighting box around the arrow, if there are already lots of things in the slide.
Hold down CTRL and click on the arrow to deselect it, and then press Delete to remove all of the unwanted elements.
You've now got a nicely curved arrow that you can resize or recolor to whatever you want. This trick works with many other SmartArt objects, so it's worth exploring them all to see what new shapes you can pull out of them.
5. Merging smart for even more art
Now, if you do fancy making your own shapes, then a useful alternative to just grouping objects together to make a new one, is to use PowerPoint's Merge Shapes tool. Let's say we want to have a square with a hole in the middle. Start by laying down a separate shape and circle, using the normal Insert > Shapes menu.
We could make our desired object by making the circle white in color, placing it over the square, and then grouping the objects together. However, if your slides are going to have lots of complex shapes, then the file size for the whole PowerPoint can balloon in size because grouped objects remain as separate entities.
The advantage of merging is that it all just becomes one object...
The obvious disadvantage is that if you want to correct or amend something, you can't ungroup it and begin again – you'll need to use the Undo function (CTRL + Z). Well, you can, but only with one of the merge options.
To merge the shapes you want together, select them by dragging a highlighting box around them (click and hold the left mouse button) or hold down CTRL and click on the individual shapes you need to combine.
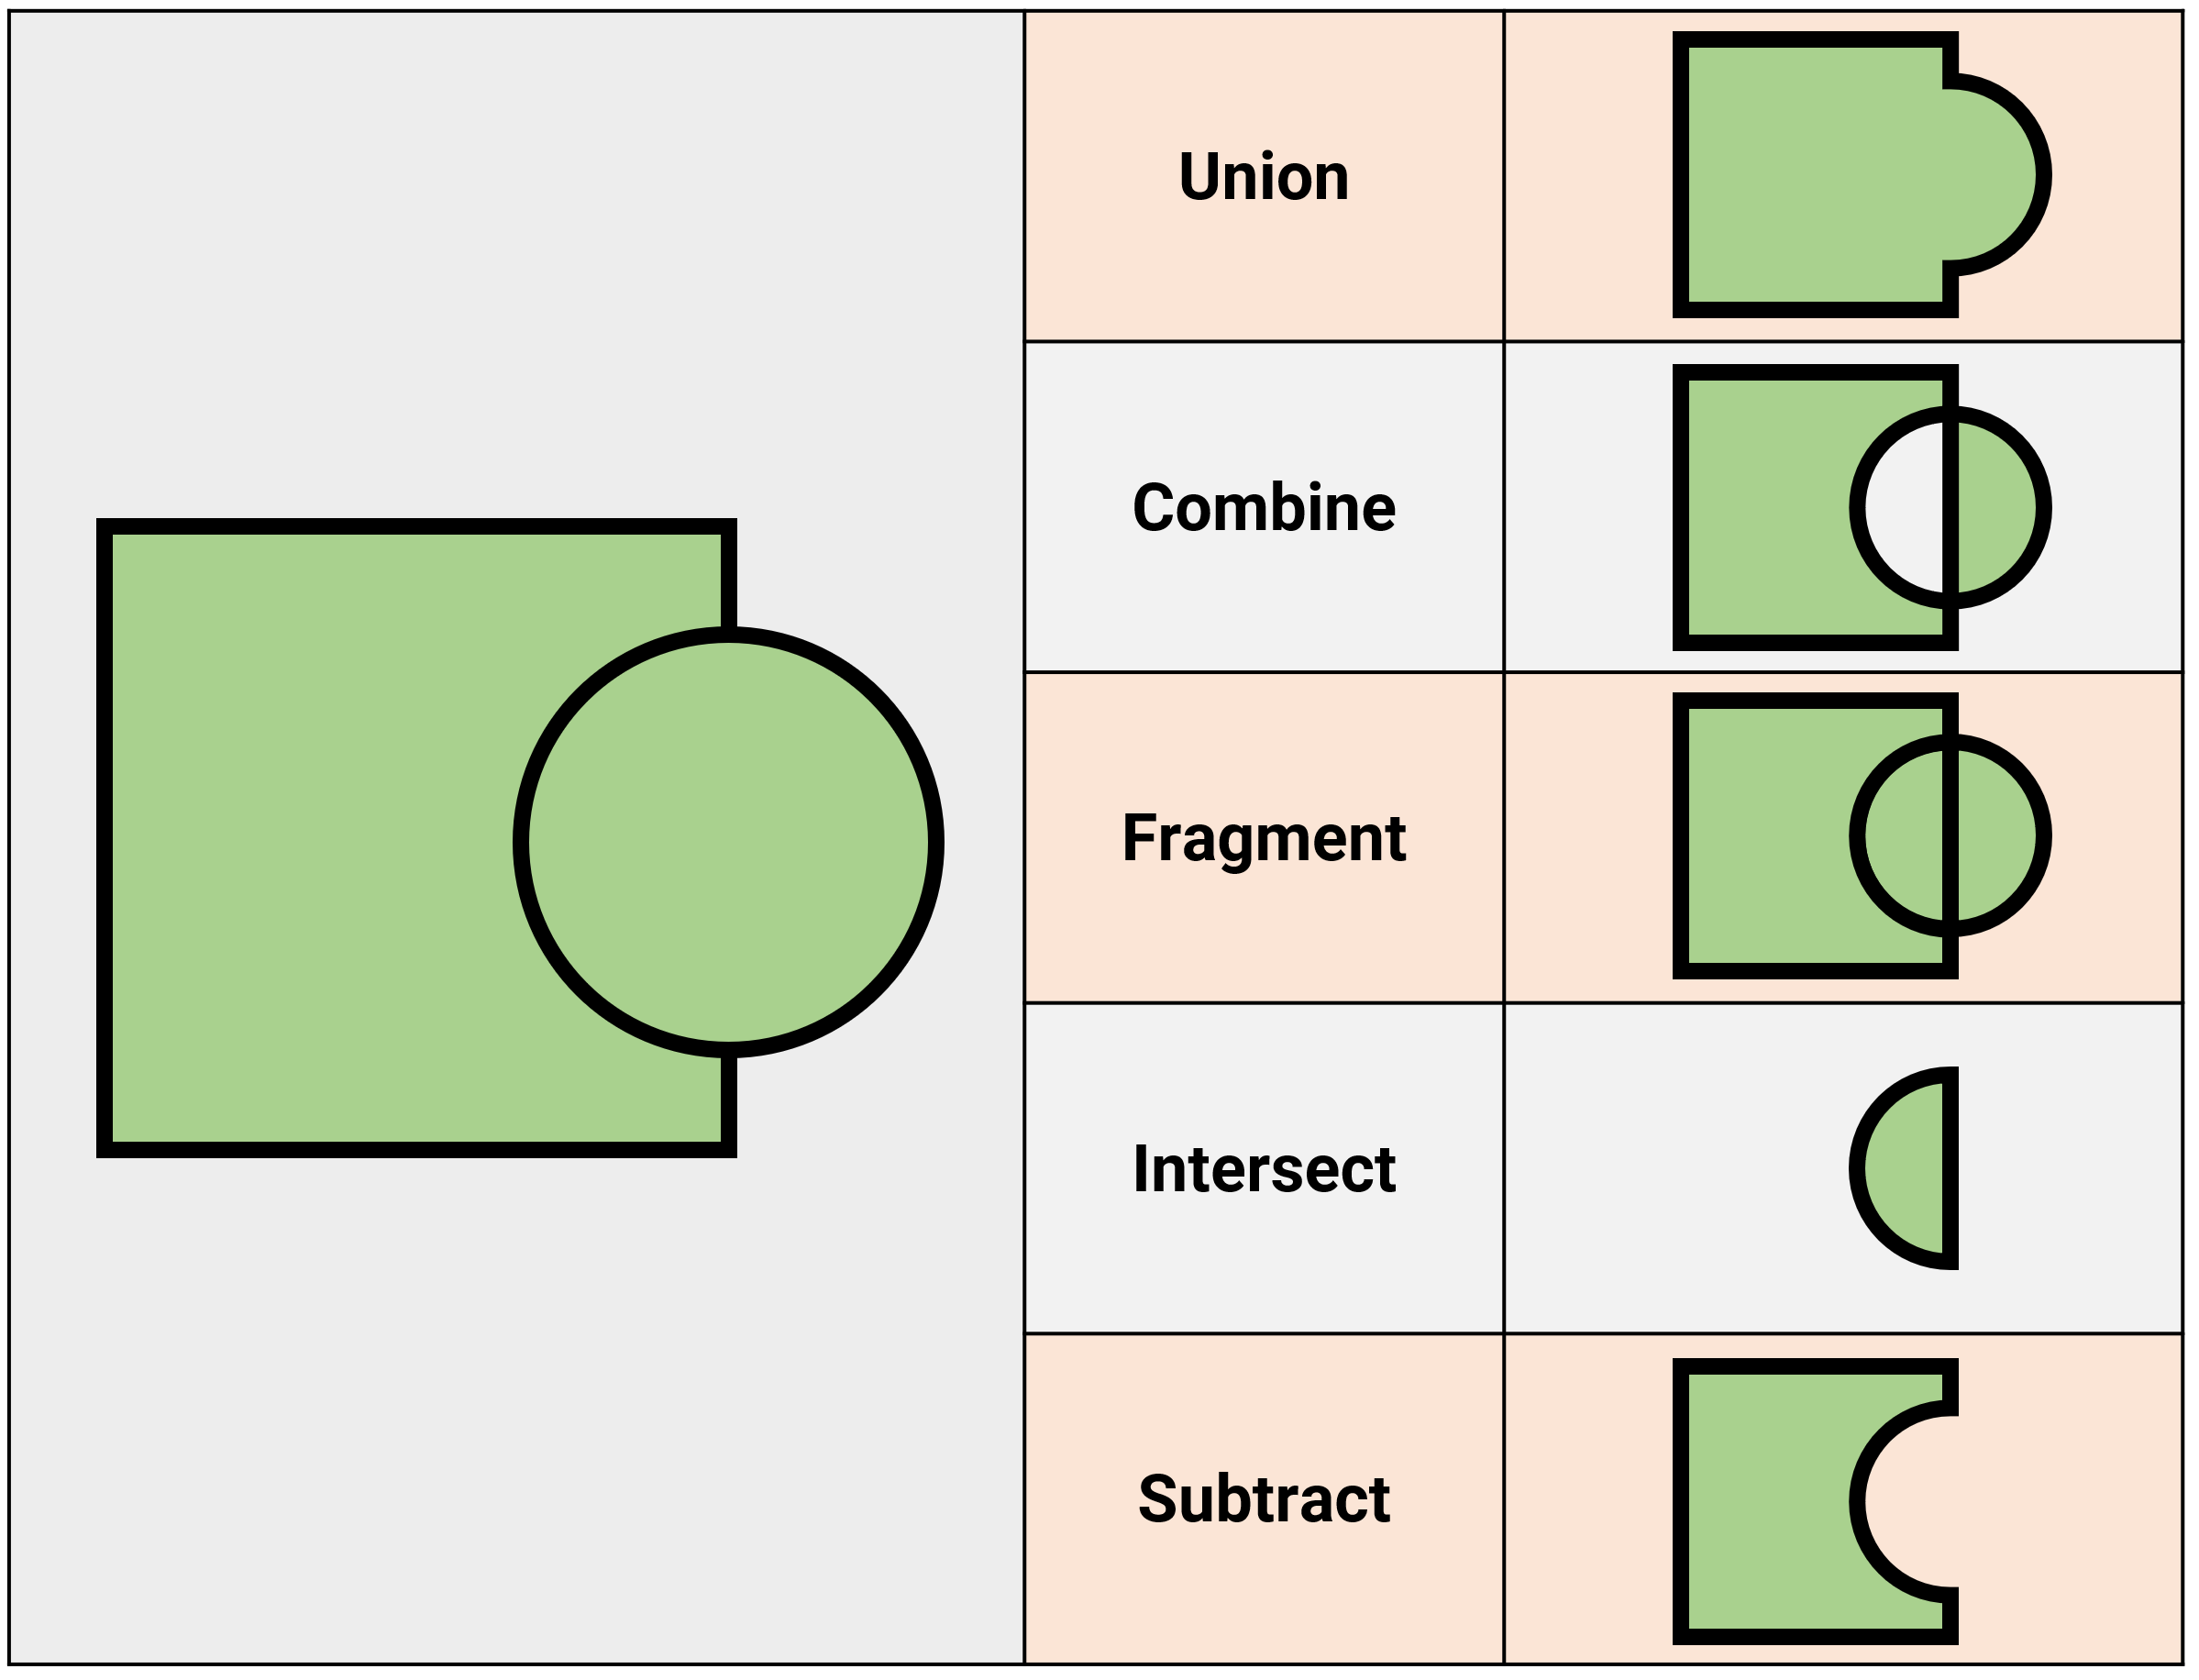
There are five ways to merge shapes:
- Union -- add shapes, ignoring any overlapping content
- Combine -- add shapes, removing any overlapping content
- Fragment -- split any overlapping content into new shapes
- Intersect -- create a new shape from the overlapping content, deleting the rest
- Subtract -- use the shape that's in front of the other(s) as a mask, deleting it and any overlapping content
Here we can see what these options do to a circle overlapping a square:
It's important to note that you get different results depending on the front-to-back ordering of the shapes you're merging – if you look at the above image for Subtract, the circle cut the square because it was in front of it.
If the order of the shapes was reversed, the square would cut the circle in half, leaving a semicircle behind. So it's well worth experimenting to get that special shape you're after!
6. Rotating shapes: the key(s) to better turn arounds
There are a couple of ways of rotating shapes in the most recent versions of PowerPoint. Click on the object and you should see a rotating arrow, linked to the shape – click and hold, then move your mouse about to rotate.
Doing this accurately isn't easy though, especially on laptops with poor trackpads. You can enter an exact angle size for the rotation, using the format menu (right-click on shape, Format object, click on the Size & spacing icon), but don't bother with it.
The best way to rotate an object is to use the keyboard – hold ALT and then press the left or right arrow key to spin the shape through 15°, or hold ALT+CTRL and then left or right to shift through angles of just 1°.
With a bit of practice, this method will have you spinning objects quickly and accurately, and it's by far the best method of rotating shapes that are very small.
7. Reap what you sow: Crop and edit images in-app
A picture is worth a thousand words, or so the saying goes, and choosing the right look for any images inserted into a presentation can be a little tricky. Fortunately, PowerPoint comes with some handy tools to manipulate images quickly and easily, ensuring that you don't have to use another application.
And probably the best function is the Crop tool.
Start by inserting an image into a slide (Insert > Pictures > This device... or drag and drop it). The toolbar containing the Crop tool should be visible, but if it's not click on the image and then on Picture Format.
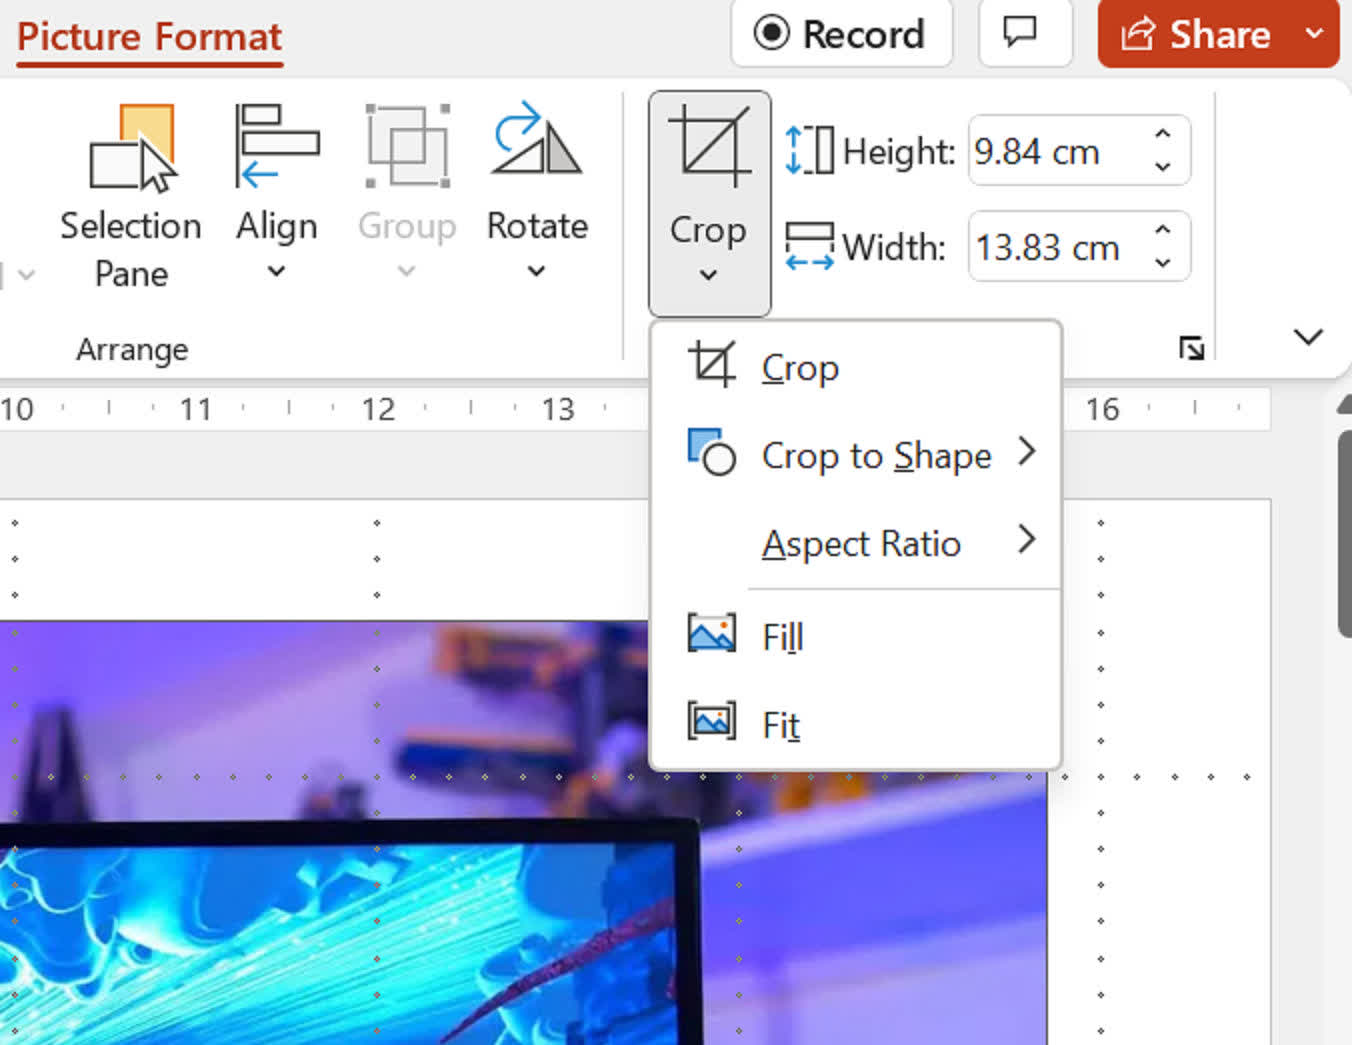
There are lots of options here, so let's go through them carefully. The first option, just called Crop, will add a set of small thick bars about the image.
Click and hold the left mouse button down, and then drag out a dark area across the image – this darkened region is the part of the image that will be cut away, leaving the non-dark area behind.
However, it won't do anything until you click outside the image.
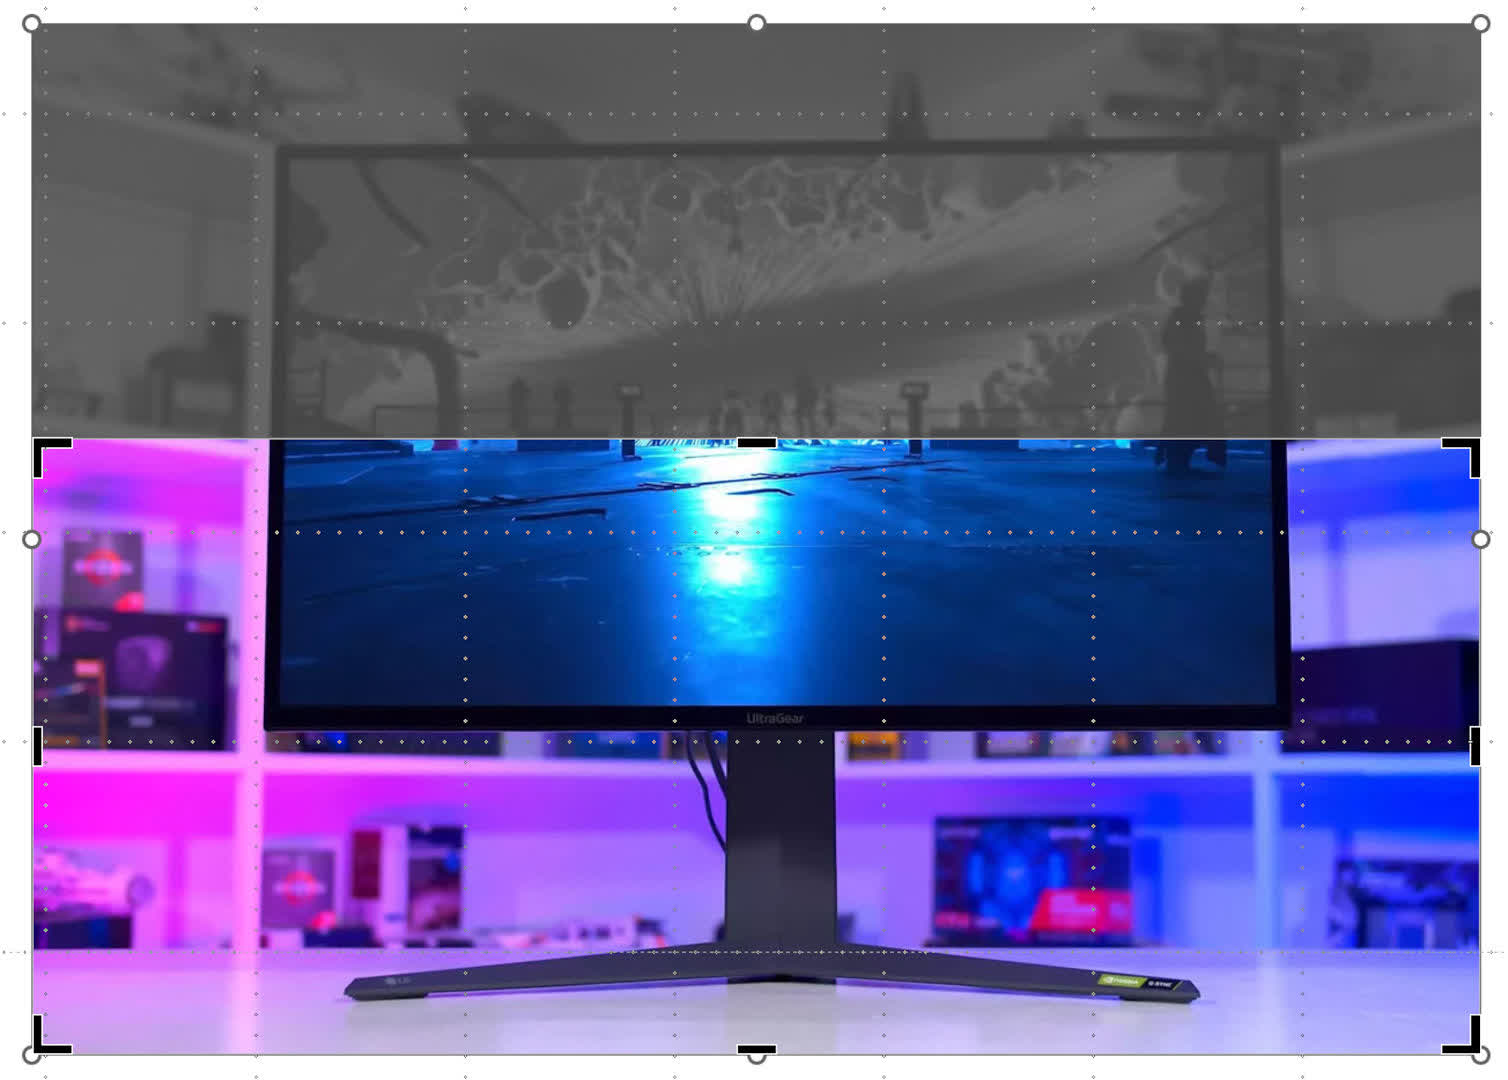
This means you can go back and adjust the cropping area until you're satisfied. Even if you're not happy after, you can always use Undo to go back to the original image.
Note that the corner bars don't apply a diagonal cut effect – this just allows you to create a section of the picture, that's rectangular in shape. To do something fancier, then you'll need to use another cropping function.
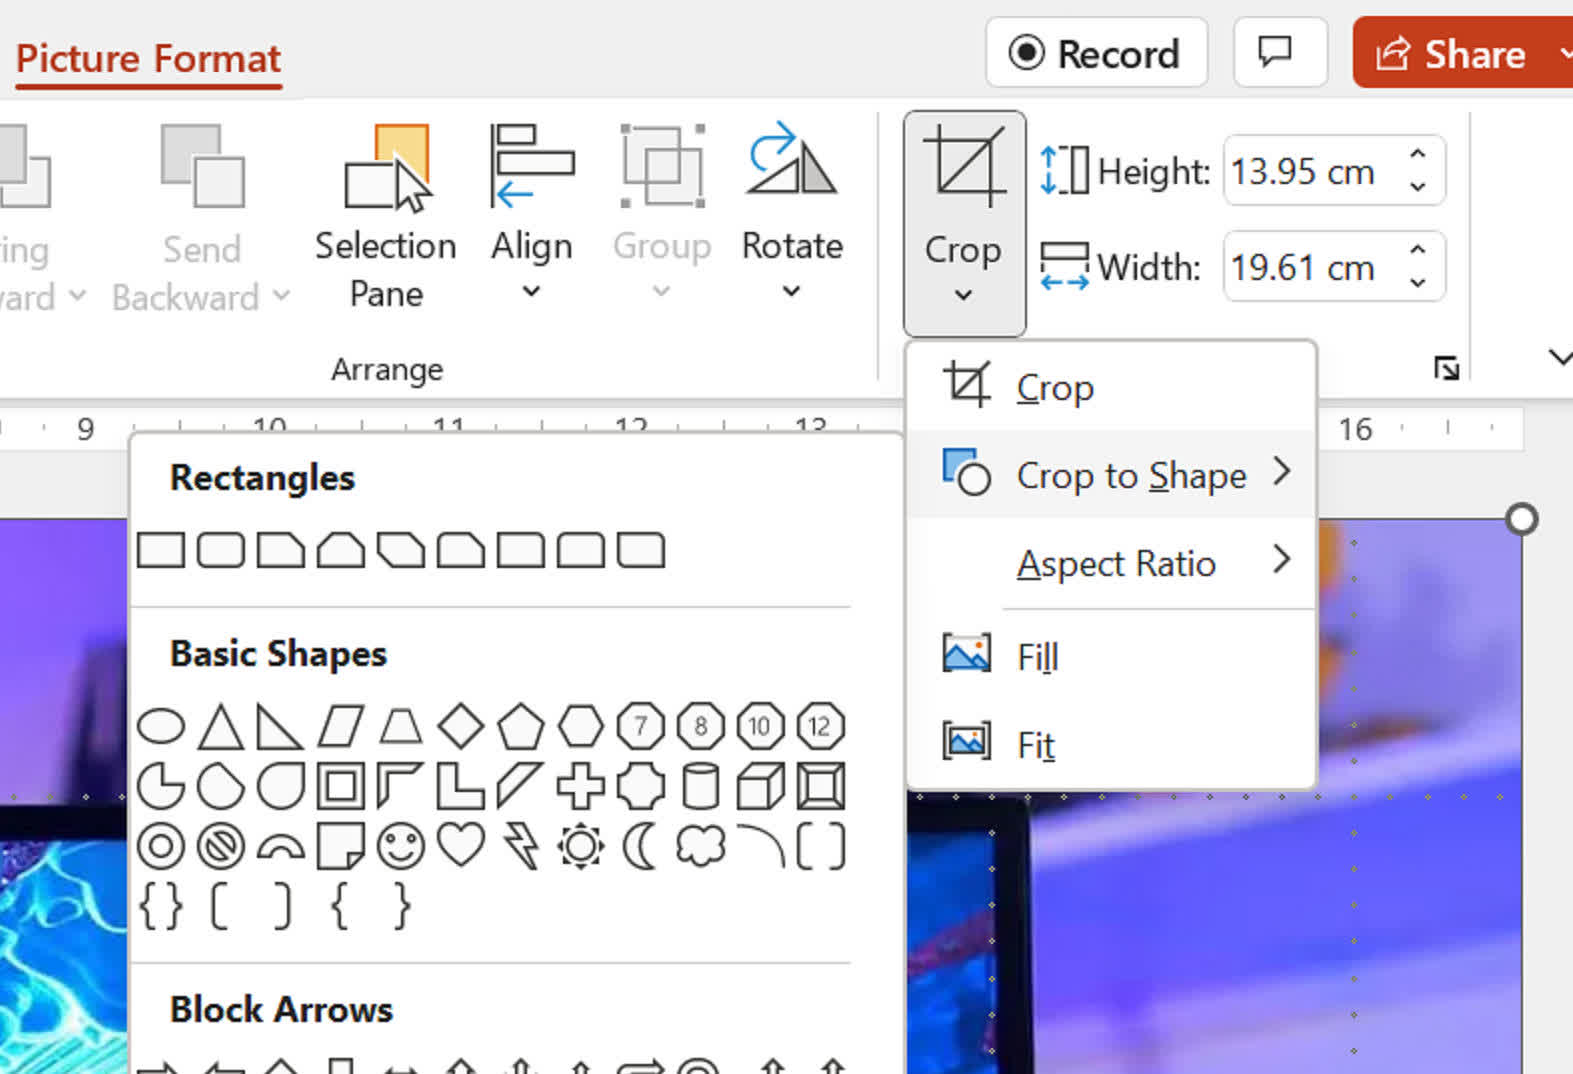
The next two cropping options (Crop to Shape and Aspect Ratio) will cut the picture up, either by using a standard shape as a mask or by using a predefined height-to-width ratio.
Crop to Shape is especially useful for creating versions of pictures that have more of a creative impact, than just using the original image. Not all shapes make for a useful crop, but ones like the curved corner rectangle or the block arrows can easily give your presentation the visual kick that you're after.
The final two options (Fit and Fill) should be used after you've used Crop to Shape – when you select either of these, a new set of black bars will appear around the image.

Fill will make the picture take up the whole shape, but you might lose some parts of the image in the process. Fit will try to make the picture fill the shape while keeping the image's aspect ratio intact.
You can create your own cropping mask by drawing out a range of shapes and then grouping them altogether (CTRL+A to select them all, CTRL+G to group them). Copy the picture you want to crop (CTRL+C) and then right-click on your new mask and select Format Shape.
Then, in the Fill section of the formatting options, click on Picture or texture fill, and then click the Clipboard button. This will then paste your copied image into your mask shape.
As with all these tools, take some time to experiment and practice with the various options and cropping choices. The original image is never actually lost in any way, so you can always undo your edits and try again.
8. Select overlapping or hidden sneaky shapes
If you have a slide with lots of objects scattered about, it can be tricky highlighting the one you want to move or edit – especially if it's hidden behind a stack of other shapes. Fortunately, PowerPoint has a simple system that lets you quickly select an object, even if you can't see it.
Take an example where there are three shapes present: a square, a circle, and a triangle. The square is bigger than the other two and it's in front of them, so they're completely hidden.
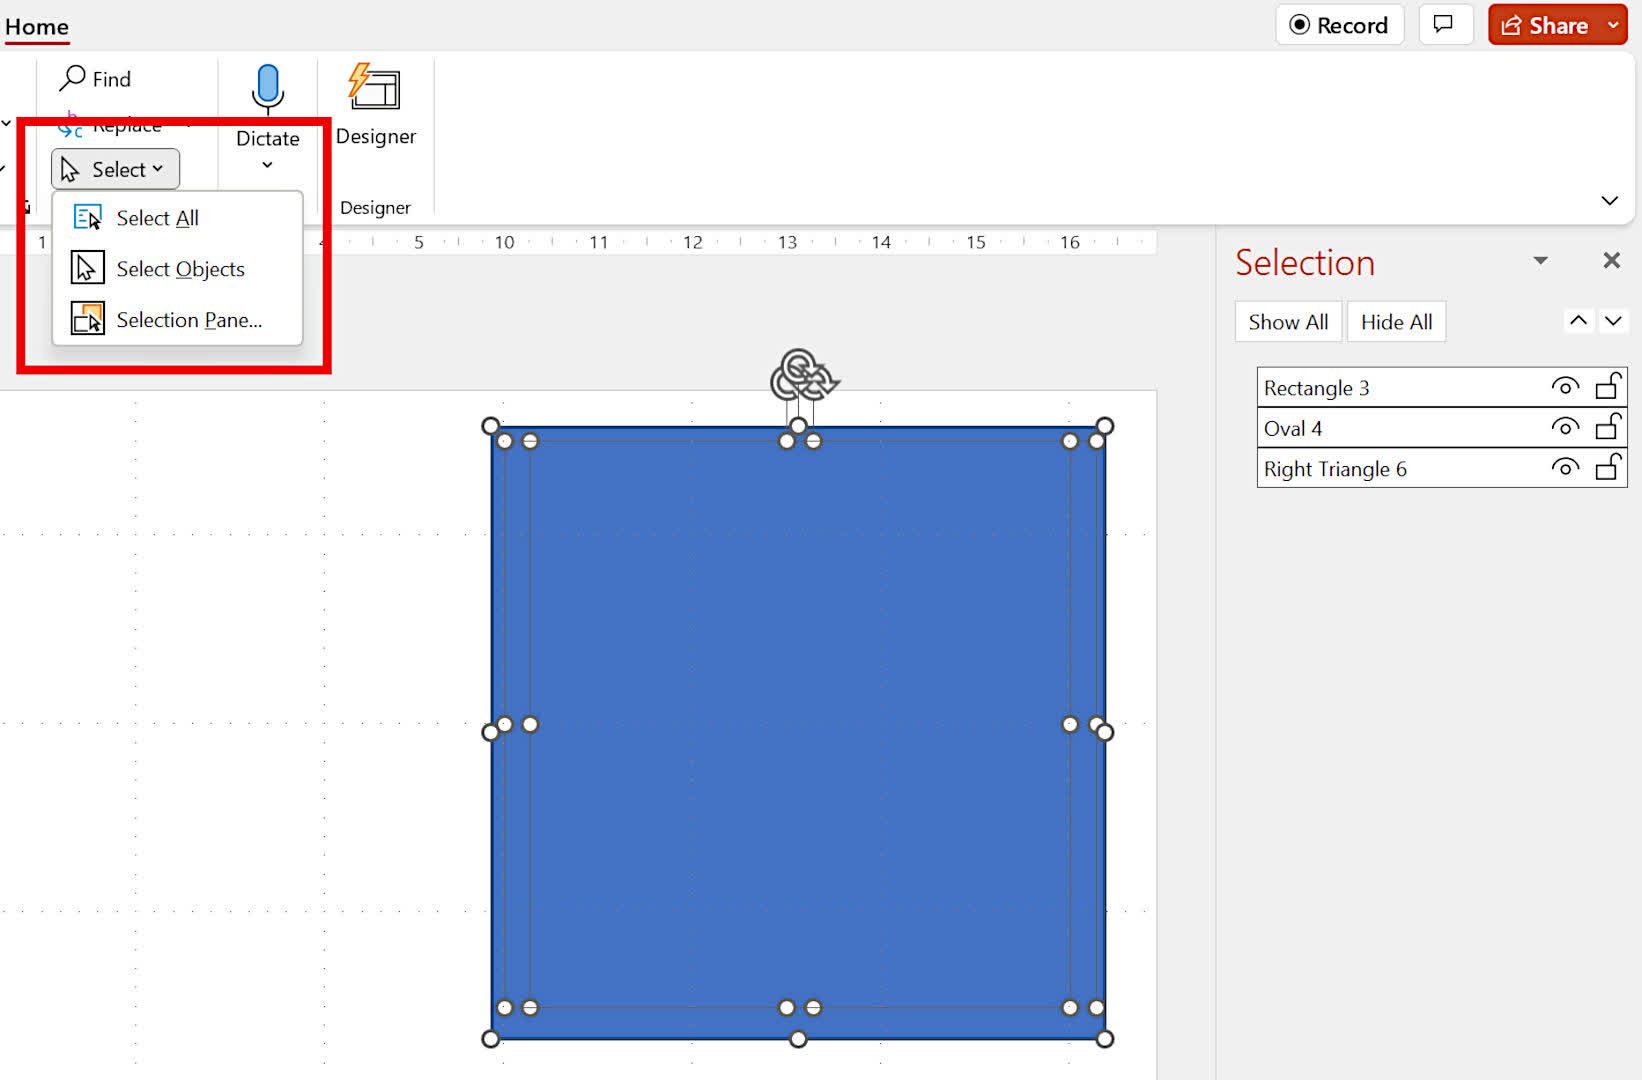
So let's say we want to change the circle. Click, hold, and drag a highlight box around the objects you want to manage. Then, in the Home toolbar, go to Select (or consecutively press ALT, H, S, L). Now click on Selection Pane.
Here we can see our three objects, listed in their front-to-back order. Clicking on any of the list entries automatically selects that object, allowing you to then move it about, change its color, or delete it altogether.
Clicking on the small eye icon will disable the object from view. The padlock icon will lock the shape in position and prevent you from changing its size, although you can still change its color. Now you'll be able to chop and change even the most complex of slides!
9. Virtually present with nifty narration
PowerPoint presentations are often required to be used in conjunction with giving a talk or lecture, but you don't have to be physically present to do this. With the right equipment and a few clicks here and there, you can add your virtual presence to any slideshow. To do this, you'll need a good mic connected to your PC and a quiet room, with no echo.
Start by creating all of the slides and content you need first, then for each slide, add an audio recording (Insert > Audio recording). A speaker icon will appear on the slide and a small window will pop open.
Give each recording a unique name, even if it's just "audio slide 1", and then click the small red circle to start recording. Once you've finished, click the small square next to it.
It's worth trying this a few times unless your narration for each slide is really long, so click the play button to hear it through. If you're not satisfied with what you've just done, you can just hit the record button to overwrite it.
Once you're happy with the recording, click the OK button, and then immediately click on the speaker icon, followed by the Playback option in the main toolbar.
For automatic narration, there are a few things to ensure you have set right.
First of all, change the Start mode to Automatically, then make sure all of these options are unticked – Play across all slides, Loop until stopped, and Rewind after playing. Finally, tick the Hide During Show option.
In this same section, you can trim the audio, so if you have too much silence at the beginning or end of the recording, you select when the narration will start and finish.
All of these settings will ensure that the narration automatically starts with each slide transition, as well as hide the speaker icon from view. By having the audio run by itself, the slides will also progress without any input being required.
10. No laser pointer? No problem!
This last tip is simple, but an absolute boon if you've forgotten your laser pointer for a presentation or its batteries have gone flat. Start your PowerPoint slideshow (don't forget tip #1!) and you'll notice that as soon as you move your mouse or touch the trackpad, a cursor will appear on the screen.
Press and hold down the CTRL button, then click and hold the left mouse button, and it will turn into a perfect laser dot!

It's not the greatest of things, of course, and it can get fiddly having to manage both the keyboard and mouse/trackpad at the same time, but it's a handy alternative to a pointer.
Like so many office applications, there are many little additions that can make your life simpler or help you out when stuck. If you're a regular user of PowerPoint and have some great suggestions, feel free to share them in the comments section below.
You may also want to check out our Top 10 Hacks for Microsoft Word and Top 10 Hacks for Microsoft Excel.

